Step by step guide for LEGO MINDSTORMS EV3 to install and run both Python and MicroPython. It’s really easy and requires no hacking or weird codes. The only thing you need is MicroSD card.
Setting up the EV3 for Python and MicroPython
The easiest way to get started is to head over to LEGO Education and download their new python software and image. They packaged the community built firmware with some extra tools to get started easily. Here are the steps I used to run it.
Time needed: 10 minutes
How to run MicroPython and Python on LEGO MINDSTORMS EV3
- Get a 16Gb Class 10 Micro SD card
I like Sandisk Extreme. I believe a Class 4 8GB would work too, but it’s slower.
- Download the EV3 MicroPython image from LEGO Education
Do NOT unzip the downloaded file.
- Burn the image to your Micro SD Card
I use Balena Etcher to write the image. It will ask for an admin password because it needs low level access to your SD card.
- Insert your micro SD card into the SD card slot on the EV3 Brick and turn it on
I recommend putting a piece of tape on your MicroSD Card so you can easily pull it out of your MINDSTORMS EV3 brick again. When you boot it, it will show a lot of scrolling text and take a while. Go on to the next step while it’s starting.
- Download and install the free Visual Studio Code editor
It’s hosted by Microsoft.
- Install and activate the LEGO Education EV3 extension
Launch VS Code and click the extension marketplace icon in the left icon bar. Search for LEGO EV3.
- Connect the EV3 brick with USB to your computer
It has probably fully booted by now.
- Connect to the EV3 in the file browser
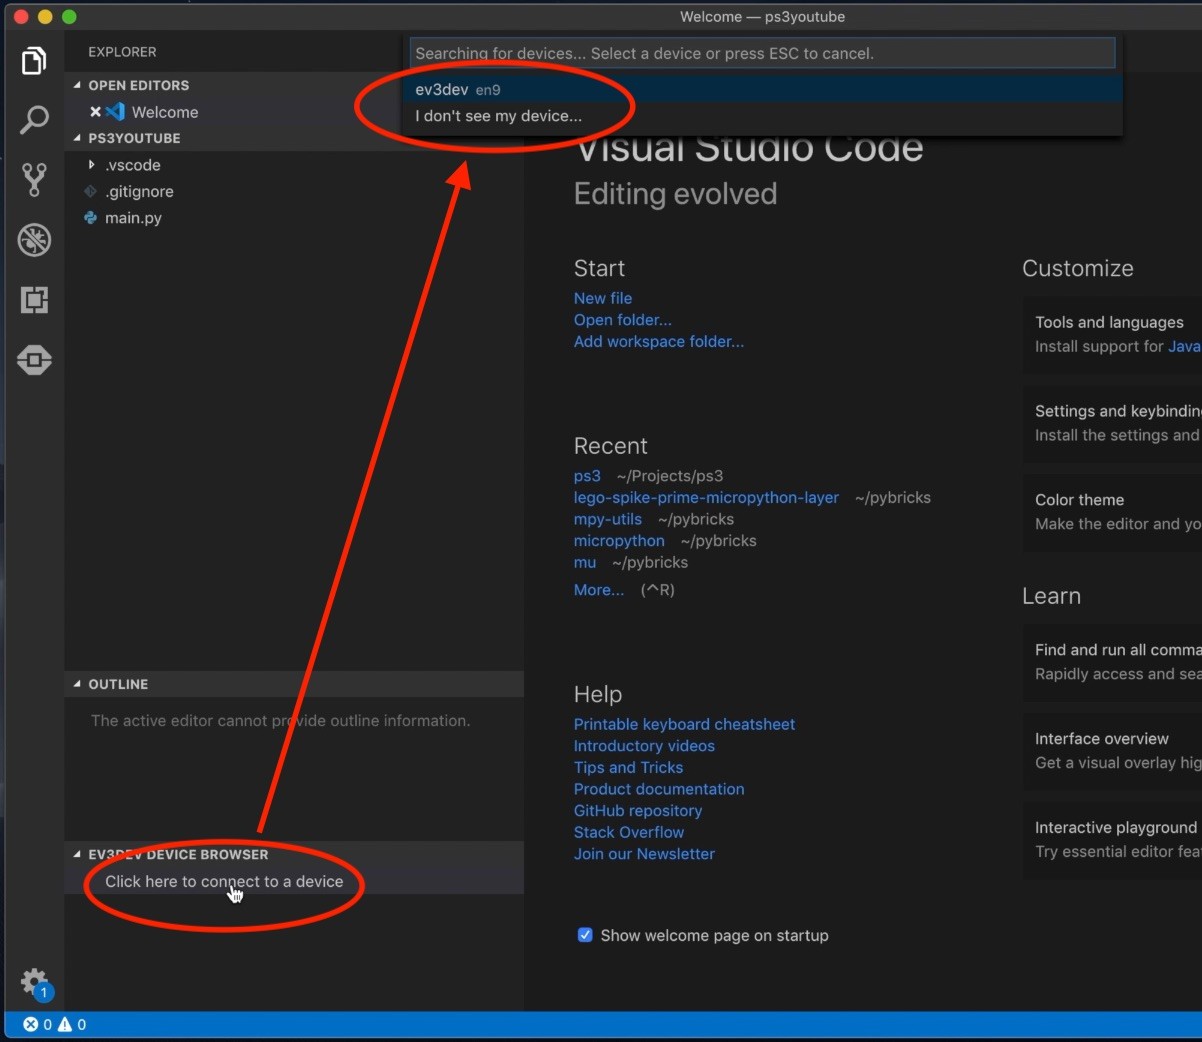
Go to the file browser in the left icon bar in VS Code. In the bottom part of column with the files there’s a bar called ‘ev3dev device browser’. Click it and then click ‘Click here to connect….’. Select your ev3 device.
- Create an empty EV3 micropython project
Select the EV3 icon in the left sidebar in VS Code. Click ‘create new project’. Open the ‘main.py’ file
- Press F5 to run the demo program
The EV3 brick will beep, because that’s the only command in the default main.py file. It worked!
Your first EV3 MicroPython Program
Once you have set up VS Code and the LEGO and ev3dev extensions you can your own code. Make a new empty project with the EV3 extension if you haven’t yet done so. Remove all of the text from the main.py file and replace it with the program below.
The first line – the shebang – tells the software which Python to use. The default is micropython, but you can replace it by #!/usr/bin/env python3 to run Python 3.
The next few line import handy classes for controlling the brick. In my program below, we’re just going to show hello world.
#!/usr/bin/env pybricks-micropython

from pybricks import ev3brick as brick
from pybricks.ev3devices import (Motor, TouchSensor, ColorSensor,
                                 InfraredSensor, UltrasonicSensor, GyroSensor)
from pybricks.parameters import (Port, Stop, Direction, Button, Color,
                                 SoundFile, ImageFile, Align)
from pybricks.tools import print, wait, StopWatch
from pybricks.robotics import DriveBase

# Beep. To get your attention.
brick.sound.beep()

# Clear the display
brick.display.clear()

# Print ``Hello`` near the middle of the screen
brick.display.text("Hello", (60, 50))

# Print ``World`` directly underneath it
brick.display.text("World")

# Show the current voltage
brick.display.text("Voltage is: {}".format(brick.battery.voltage()))

# Wait until a button is pressed
while not brick.buttons():
    wait(10)
Now pressing F5 on the keyboard runs this code on the brick. Neat, huh? It’s pretty fast too. So you can quickly develop and debug.
What next?
Now that it’s running you can go on and program a Lizard in python. Or connect a gamepad and remote control your robot. You can also read the complete documentation for programming your robot.


Hi Anton,
I’ve just discovered your website. I love your creations – not just great engineering but stylish too! I’m playing around with EV3 MicroPython on my Brick and am a bit stumped by a problem. I wondered if you might have any ideas? The issue seems like it ought to be simple to resolve since the functionality must already be there but I can’t seem to find the right commands to make it work. All I want is to is pass data (in plain text files or just as output from the MicroPython code) to and from the Brick on the fly. I can do the file reading/writing on the brick no trouble and using Visual Studio Code can upload files from the Brick and send files to it, but I want to be able to do this during a program. For example I might want to record the output from one of the Mindstorm devices such as the colour sensor, send this to my computer and plot it on a graph or feed it into Excel or some other software or script. I can write such ouputs into lists, tuples or strings and they will display in the VSC output window, so clearly the information is already making the journey from Brick to PC anyway, I just need to be able to capture it.
Many thanks for your time.
If you use VS Code and micropython, you can just use the print command from pybricks. It will print to the vs code console. Otherwise I suggest you use a micropython logging module. I thinks it’s called ulogging. Or just the plain python open() method to open a new file and write your data to it.
Nice article, really great.
I followed the steps you provided, but I dont get import-resolved hence no autocompletion in vscode.
Am I supposed to install other stuff to make it work?
Nope. Can’t be done for now. We’re working on that. When it’s released I think I’ll write a new article.
Any update on getting autocomplete to work? I’ve got a dozen 9-12 year old kids (3 fll teams) that are struggling a bit with this. I’d love to get something up and running before school starts.
My current backup plan is to just go in and code my own class that ‘wraps’ all the documented functionality, then i’ll get autocomplete for the wrapper and I can just hand that off to the kids. I’m not the best at python though so I’m really hoping you guys pull through.
Hang in there! Great job with the kids! We are in the process of setting a wrapper up in pypi, so you can pip install it soon. It will take a month or so because of some logistical issues here. Nice work on the wrapper in the mean time. Are you setting up the kids with version control to collaborate on the code?
Hello Anton,
I am getting error with both this and the gamepad example.
On this example I am getting an invalid syntax error from this code:
# Wait until a button is pressed
while not brick.buttons()
wait(10)
On the gamepad example I am getting an error at:
while event:
(tv_sec, tv_usec, ev_type, code, value) = struct.unpack(FORMAT, event)
Any ideas?
I guess your infile_path is nog configured right. Or you are using a different kind of gamepad.
My first error was being caused by a missing colon after the while line.
I am using a generic p3 gampad. Perhaps that is the issue?
Thanks,
Patrick
The struct format and length should be general for /dev/input/event*. I have the code from here (second answer) https://stackoverflow.com/questions/5060710/format-of-dev-input-event. They don’t discuss any specific devices. Are you using the LEGO SD card image?
Thanks Anton. This is my first time working with Python, Brickman, etc. I am using the Lego SD. My controller is pairing but there is no event file for it.
I am new to working with the EV3. I am using “https://education.lego.com/en-us/support/mindstorms-ev3/python-for-ev3” software.
I am looking to identify if motors from previous Lego Education product NTX can be used with the newer hardware and micro python software.
IT should work. What have you tried?
Please fix pythin script of that article. This fragment:
# Wait until a button is pressed
while not brick.buttons()
wait(10)
should be corrected to:
# Wait until a button is pressed
while not brick.buttons():
wait(10)
Done
Hi, great work!
We are having some problems which we can’t really figure out.
What is error code 1?
We also have a message:
Starting remote process failed: Failed to execute child process “/home/robot/main.py” (permission denied)
Do you have any suggestions on how to solve this?
What are the exact steps you are taking? Are you using the official LEGO Python image?
Hey there, installed Visual Studio(v1.41.1) but can get the ev3 device browser (v10.4) operational, There isn’t any display of the ev3 devices in Visual Studio. The brick is on the network and has a status of online. Using a Mac Book with the Catalina OS. Any suggestions? Many thanks
Never mind, found it in the view menu (I’m a rookie at this, helping my son get started). New problem is that an error pops up about handshaking, “Timed out while waiting for handshake”.
Have you tried Bluetooth or USB?
yep, they work fine. The strange thing is that the I can connect to the brick via WiFi using SSH but cannot connect using Visual Studio Code via WiFi. So not sure what would prevent me from using the WiFi connection. For me, much easier if I can use WiFi, Bluetooth cuts out frequently, USB is ok and works fine.
Hi
I’m having a hard time running this simple code and I need your help fixing the error.
I basically followed all the instructions above but now I’m stuck. I can’t even run the Hello World code above. My current code looks like this:
#!/usr/bin/env pybricks-micropython
from pybricks import ev3brick as brick
from pybricks.ev3devices import Motor
from pybricks.parameters import Port
# Play a sound.
brick.sound.beep()
# Initialize a motor at port B.
test_motor = Motor(Port.B)
# Run the motor up to 500 degrees per second. To a target angle of 90 degrees.
test_motor.run_target(500, 90)
# Play another beep sound.
# This time with a higher pitch (1000 Hz) and longer duration (500 ms).
brick.sound.beep(1000, 500)
the error I’m getting is this:
Starting: brickrun –directory=”/home/robot/new_project” “/home/robot/new_project/main.py”
Started.
———-
/usr/bin/env: ‘pybricks-micropython’: No such file or directory
———-
Exited with error code 127
When i replace #!/usr/bin/env pybricks-micropython with #!/usr/bin/env python3 i get this error
Starting: brickrun –directory=”/home/robot/new_project” “/home/robot/new_project/main.py”
Started.
———-
Traceback (most recent call last):
File “/home/robot/new_project/main.py”, line 2, in
from pybricks import ev3brick as brick
ImportError: No module named ‘pybricks’
———-
Exited with error code 1.
Please Help, i need it!
Looks like you didn’t download the latest official Python image from LEGO education
Where can I download that, please? Do I download it on the VS Code or…?
Have you tried googling it?
I did. I basically tried everything remotely possible. I have all the latest Python images on my VS code -i double checked, it just wont run
https://education.lego.com/en-us/support/mindstorms-ev3/python-for-ev3
Hi,
great instructions, thank you. I have followed it step by step, (and in the beginning it’s the same as the official Lego education tutorial), but have one problem:
Somehow my Visual Studio Code can’t seem to find the pybricks module. It’s the same whether I follow your code or the one already in the template of main.py. And if it can’t find pybricks, of course I can’t access any of the classes or methods needed for EV3… Am I missing anything?
Access to the pybricks module is still in development. For now, go to the Lego extension in the very left column and open the HTML docs from there.
Thank you for this article. I am trying to make EV3 speak a string text. What module do I need to import?
I don’t think there is a micropython voice synthesizer. Maybe python3, but I doubt it.
Hello Anton! Thank you for this cool article, it was really clear and easy to understand, but I have on question. I am currently working on a project with the robot, but for it to work, I need to get a runtime input from the user. Is there ANY way of doing such thing? I’ve tried everything I could think of but nothing comes to my mind. If I can’t do that, can you suggest me something else, that will do the job? I need two runtime inputs that will determine the rest of the code logic, both are just numbers 0-5. Thank you in advance for your time.
Thanks for this post
I’m using vs code to connect to EV3DEV . Connection is succesful.
But getting ModuleNotFoundError: No module named ‘pybricks’ error when i try to run the following code. Am i doing something wrong here?
Environment:
Python Interpreter : Python 3.7.6 64 bit,
Installed LEGO® MINDSTORMS® EV3 MicroPython Extension and Installed Python 3
#!/usr/bin/env pybricks-micropython
from pybricks import ev3brick as brick
from pybricks.ev3devices import (Motor, TouchSensor, ColorSensor,
InfraredSensor, UltrasonicSensor, GyroSensor)
from pybricks.parameters import (Port, Stop, Direction, Button, Color,
SoundFile, ImageFile, Align)
from pybricks.tools import print, wait, StopWatch
from pybricks.robotics import DriveBase
brick.sound.beep()
You need to download the official python ev3dev image from the Lego education website.
Hi Anton,
before I start with Python on the EV3 brick following your instructions, I would like to know, how to reset the EV3 brick from Python to the original settings as they came with the product from Lego. Is it just a matter of removing the Python mircoSD card from the EV3 brick and then start it again?
Yes, it’s that easy!
Hi,
I am also getting the ‘Failed to connect to ev3dev: Timed out while waiting for handshake’ error.
Could you please get me unstuck…
Did you try following the video on youtube?
I’ve tried to get this thing working multiple times, but it just won’t work! I’m trying to get the image on the SD card, but it just keeps saying “Flash Failed”. I’ve looked it up and there’s nothing on it? Could it be my SD card?! Thanks.
SD card is very likely. Also a different flashing software could work. And maybe the wire between your flash card and pc… These things are finicky. I use a class 10 or better micro SD.
Hi folks! Please give me an advise what would be better to use for EV3: ev3dev or ev3micropythonv200sdcardimage (from Lego site)?
Doesn’t matter much. I think ev3dev is a bit more recent, but is basically the same.