This tutorial will show how to connect an I2C joystick to the LMS-ESP32 board and read that I2C sensor from the LEGO MINDSTORMS or SPIKE Prime hub. Many third-party sensors use that protocol, from langer range finders to IR matrix sensors, gesture recognition hardware, and humidity sensors. The LMS-ESP32 board will run some Micropython code to drive the sensor and respond to readout requests from the LEGO hub.
We assume you have set up and connected your LMS-ESP32 board to the LEGO hub for this tutorial. It also helps if you know your way around Thonny and the basics of UART communication with the board.
I2C devices and the LEGO MINDSTORMS hub
I2C is a protocol invented by Philips in the early ’80s using only two wires (clock and data) to establish a fully bi-directional communication line. It uses a bus topology, where a single master can drive multiple slaves on the same bus. Each slave on the bus must have a unique address.
The ESP32 has multiple I2C bus drivers, and we can assign them to almost any two pins. In the code snippet below, we assign driver 1 to pins 4 and 5. And we name the driver object ‘i2c’.
from machine import I2C, Pin

i2c=I2C(1,sda=Pin(5), scl=Pin(4))

i2c.scan()
On our LMS-ESP32 board, pins 4 and 5 are wired to the white Grove port. Grove is a common standard with easy-to-connect GND, 3.3V, SDA, and SCL pins. The SDA and SCL pins are connected to GPIO5 and GPIO4, respectively.
Using the i2c.scan() function, we can scan for I2C devices present on the bus. If you connect an I2C device, you should see an array with one or more addresses (some I2C sensors can have multiple addressable I2C devices).
I2C Joysticks from M5Stack
In this tutorial, we want to connect an I2C joystick. We then use the readings from that joystick to move a pixel on the LED screen of the Lego hub. There are many i2c joysticks, but we choose the M5Stack joystick. The M5stack units all come with LEGO-compatible attachment holes, and it has a handy Grove port.
Video tutorial for connecting the i2c joystick to LEGO MINDSTORMS and SPIKE Prime hub
Now that you have all hardware collected and set up, you’re ready for the video tutorial about connecting the I2C joystick to MINDSTORMS.
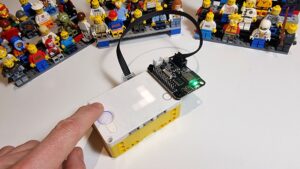
The pixel on the LEGO hub is not very visible in the video above. Therefore, the movement of the pixel has been recorded with slightly better light conditions below.
Code used in this tutorial
The code from this tutorial can be found in this GitHub repository. The programs can be found in joy_LMS_ESP.py and joy_SPIKE.py, respectively. We also included a copy of the code below:
LMS-ESP32 code (joy_LMS_ESP.py)
from machine import I2C,Pin
from uartremote import *            # import UartRemote library

ur=UartRemote()
i2c=I2C(1,sda=Pin(5),scl=Pin(4))    # initialize I2C port as first hardware port
                                    # clock = Pin(4) and data = Pin(5)


def read_joy():
    q=i2c.readfrom(82,3)            # read 3 bytes from I2C sensor at address 82
    x=q[0]                          # x coordinate is first byte
    y=q[1]                          # y coordinate is 2nd byte
    button=q[2]                     # button pressed results in value 1 in the final byte
    return x,y,button

ur.add_command(read_joy,'repr')     # add the command 'read_joy' for use by the SPIKE Prime

ur.loop()                           # loop and wait for receiving 'read_joy' command
Using the i2c.readfrom(82,3) we read 3 bytes from the I2C device at address 82. The joystick encodes the x-position (between 0 and 255) in the first byte, the y-position (between 0 and 255) in the second byte, and the status of the pressed button in the third byte (0 or 1).
LEGO Hub code (joy_SPIKE.py)
from projects.uartremote import UartRemote
import hub
import time
hub.display.pixel(0, 0, 9)

ur=UartRemote('D')                 # LMS-ESP32 is connected to port "D", change if otherwise

def plot_pixel(x,y):
    hub.display.clear()
    hub.display.pixel(x,y,9)       # plot pixel @ coordinate (x,y) with intensity 9


while not hub.button.left.was_pressed():
    ack,joy=ur.call('read_joy')
    x_pixel=joy][0]//52            # joystick value between 0..255, x_pixel = 0..4
    y_pixel=joy[1]//52             # joystick value between 0..255, y_pixel = 0..4
    plot_pixel(4-x_pixel,y_pixel)  # mirror in x directorion: 4 - x_pixel
    time.sleep_ms(50)              # sleep 50ms (~20 loops per second)
In this demo program, we use the hub.display.clear() method to clear the display. Once the screen is clear, hub.display.pixel(x,y,brightness) shows a pixel on position (x,y). Since the joystick returns values between 0 and 255 and the screen needs pixel coordinates (x_pixel,y_pixel) between 0 and 4, there are some calculations to do. In Python, the // division results in integer numbers, no remainder, and no fractions. So 255 // 52 is 4, and 51 // 52 is 0.
Need more help with MicroPython, LEGO Hubs, and I2C joysticks?
This tutorial is part of a multi-part tutorial. First, we set up the hardware, then we explain communication; next, you’ll learn about controlling RGB LEDs and then about I2C joysticks. You can also load MicroPython modules dynamically with our library. And there are more libraries to come.
We’d love to see what you build, and maybe we can help you with some questions. Drop us a line on Facebook!



Thanks a lot for all your hard work in making these tutorials, both on this webpage and on YouTube; they’re really helpful. My main goal is to communicate with the ESP32 to get sensor data and also to control servos. So far I’ve been able to do this with the ESP32 connected to the Spike Hub and both the ESP32 and the Hub connected to my laptop via USB cable. I’ve also been successful in using the ESP32 in stand- alone mode by downloading the program as main.py. The missing piece of the puzzle is to do the same thing with the Hub so that I can just have the ESP32 connected to one of the ports with the program also running on the Hub in stand-alone mode (i.e. no cables going to the computer). So I guess my question is: how do i get my program into the Hub so I can start the program by pressing the run button.
Hello Marc, I am glad that you find the tutorials useful and good that you succeeded in getting everything working so far. The missing piece for your project I forget to mention in the tutorials. I use Thonny on the Lego hub only for developing and debugging the hub’s program because I can quickly paste code in the interactive REPL prompt. If everything works fine, I use the Mindstorms or SPIKE prime app on the PC and paste the Python-code into a new program. Then I use the app to store the program on the Lego Hub. Hope this helps, good luck! If you want more flexibility on the LMS-ESP32 side, you could try to implement the dynamic modular loading as discussed in Part 4 of the tutorials.
Just thought of something else; there doesn’t seem to be any way to create two instances of Thonny on a Mac. I Googled it and the solution is to type: /Applications/Thonny.app/Contents/MacOS/thonny into the command line of the Terminal for the second instance. Hope this helps. Marc
Thanks Marc for the comment. I will add this to part 0 of this tutorial for MacOS users.
Thanks, I was able to get it to work this time. I copied:
ack,result = ur.call(‘sensor’)
print(“sensor = “,result)
from Tutorial 1 to the Spike Prime app so I could see the result in the monitor.