Making robots see and feel keeps fascinating me. In this blog, I tested a microwave proximity sensor to learn whether this radar technology has any useful applications for LEGO robots. In this article, you can read my review.
Understanding Microwave Proximity Sensors and Radar Technology
Microwave proximity sensors, like the DFRobot SEN0192, harness the Doppler effect to detect motion. Imagine you’re listening to a train whistle as it approaches and then moves away from you. The pitch of the whistle sounds higher as the train approaches and lower as it departs. This change in pitch is similar to how microwave sensors detect movement: they emit microwaves and analyze the frequency shift in the waves that bounce back from moving objects.
Radar technology, which stands for Radio Detection And Ranging, operates on a similar principle. Developed during WWII, radar was crucial for detecting enemy aircraft at great distances. Today, it’s used in everything from weather forecasting to traffic enforcement.
Reading a Microwave Sensor with LMS-ESP32
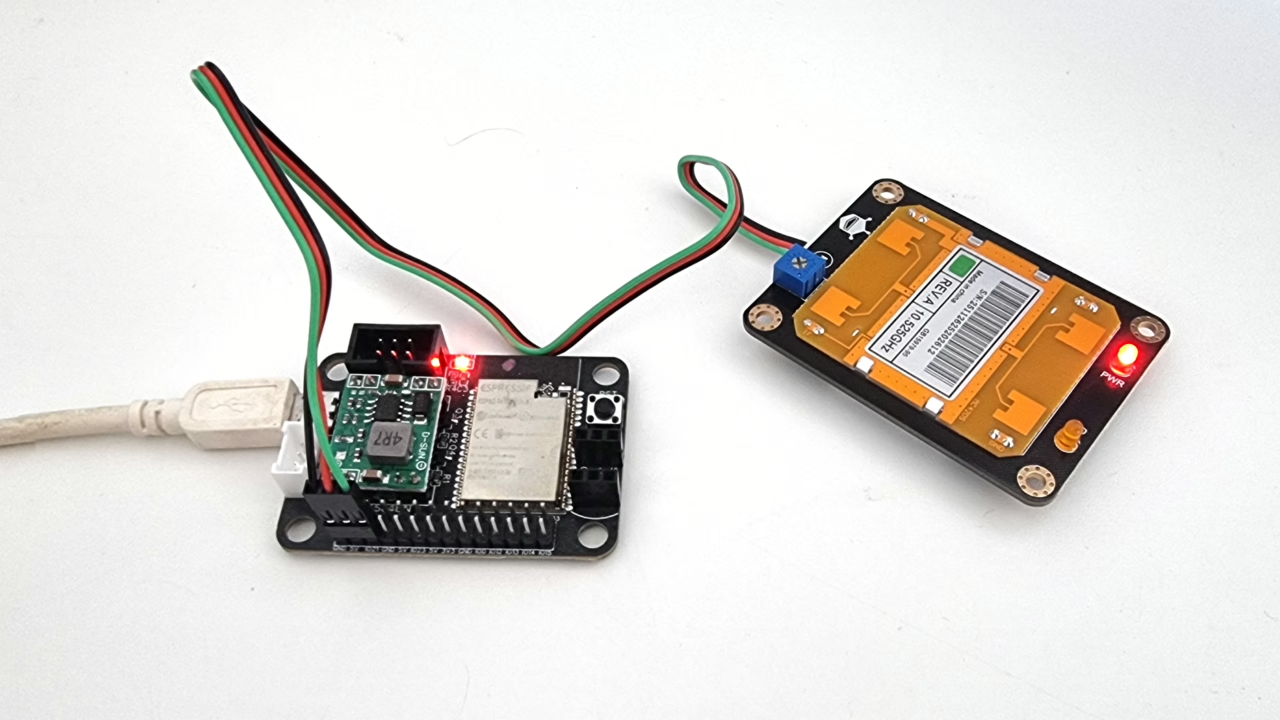
To read a microwave sensor using an LMS-ESP32 board, we simply connect the output pin of microwave to input pin 21. The included wire just slides on the header. The sensor is called “Gravity: Digital 10.525GHz Microwave Sensor (Motion Detection),” and the word digital confused me. I expect a digital interface like i2c or UART. But the output pin simply goes high (1) when there is a detection. It goes low (0) when there is none. This is digital, but not how I expected it.
The script below provided measures ‘on’ pulse times, which are shorter when objects move faster near the sensor:
from machine import Pin
from time import ticks_ms

p = Pin(21, Pin.IN)

start_time_low = ticks_ms()
start_time_high = 0
while 1:
    if p.value() == 0 and start_time_low == 0:
        # Pin went low, while start_time_low was not set
        # Therefore it must have changed
        # Record the moment it went low
        start_time_low = ticks_ms()
        # Report how long it has been high, before going low
        print("High (ms):", ticks_ms()-start_time_high)
        # Set start_time_high to 0 while we are timing the low
        start_time_high = 0
    if p.value() !=0 and start_time_high == 0:
        # Same as above, but reversed for high and low.
        start_time_high = ticks_ms()
        print("Low  (ms):", ticks_ms()-start_time_low)
        start_time_low = 0
This script helps you track how fast each movement is: shorter pulses mean faster movement.
Exploring Practical Applications
While direct speed measurement in meters per second isn’t possible with this setup, there are creative ways to use these readings. For instance, consider developing a game like rock-paper-scissors, where hand movements are detected by changes in pulse times. What other ideas do you have? I hope I have inspired you to dive into radar technology emulation with your next robotics project!


Thank you so much for providing this cool content and inspiration!