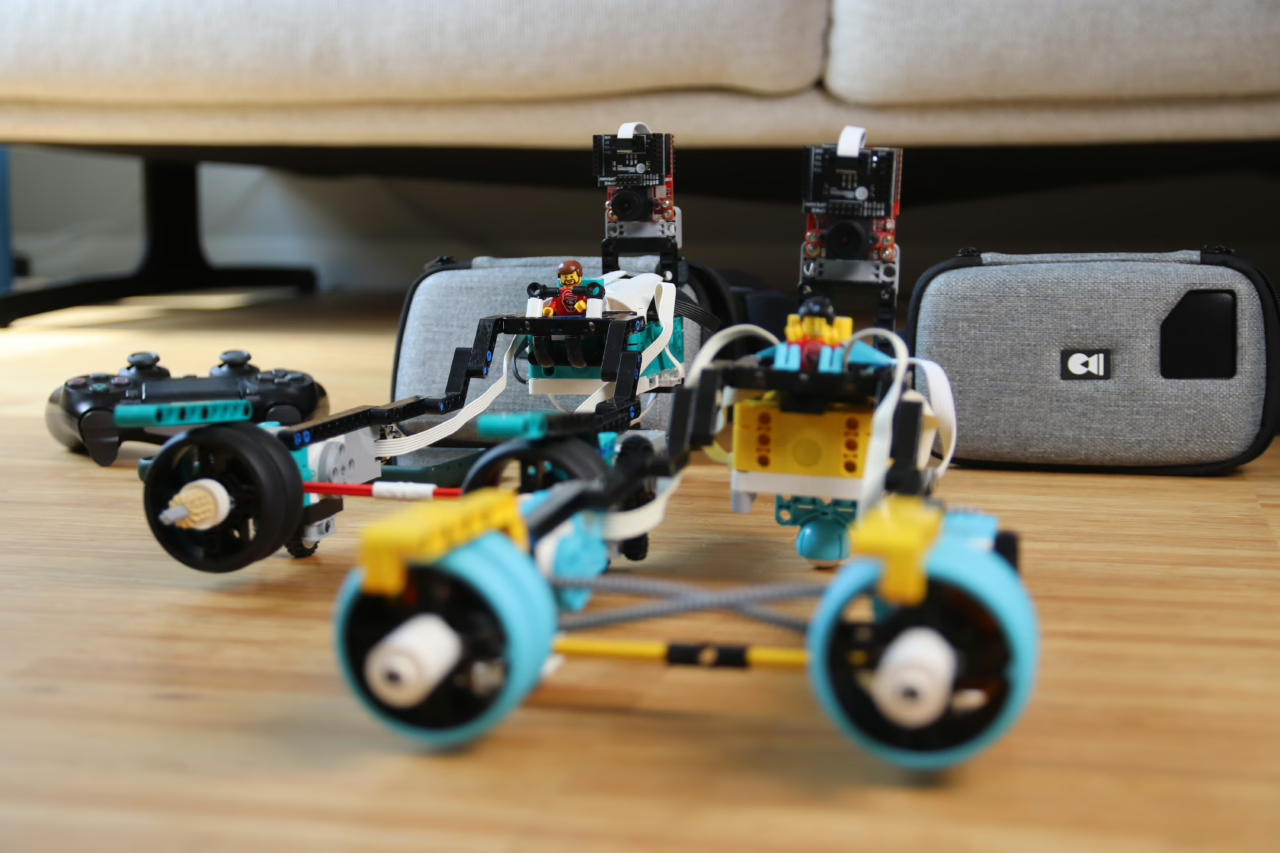
This project describes how to build an FPV (First Person View) racer using LEGO SPIKE Prime or Robot Inventor. Whether you’re a seasoned LEGO robotics enthusiast, or just looking for a fun and educational project, this guide will walk you through building your very own SPIKE FPV Pod Racer. Get ready to race through your own custom tracks is if you were Anakin Skywalker.
Required Materials for Your SPIKE FPV Pod Racer
To kick off this exciting project, you’ll need some specific tools and materials. Here’s the list.
- You can build a pod racer with either a LEGO SPIKE Prime kit or a Robot Inventor Kit.
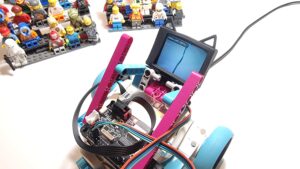
- For the video streaming capability, an OpenMV Came H7 Plus with Wifi Shield or an OpenMV RT1060 with built-in wifi is essential.
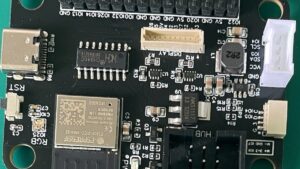
- You’ll also need a spike-openmv board to connect everything together.
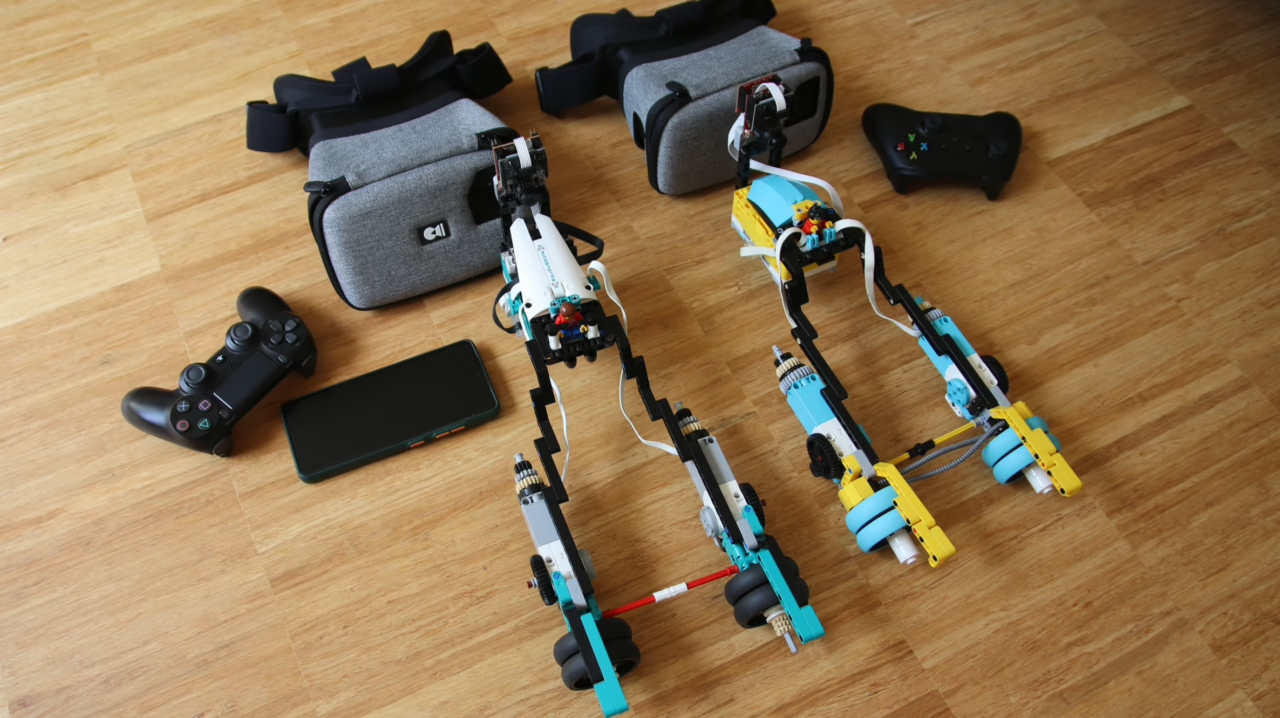
- A gamepad like Xbox Series X/S controller linked via Bluetooth.
- Optionally, if you’re using other types of game pads, an lms-esp32 module will be necessary.
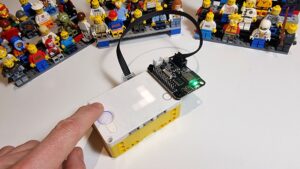
- To view the live video feed, use a smartphone paired with DroneMask2 goggles for an immersive experience.
Step 1: Build Your Pod Racer with LEGO SPIKE or Robot Inventor
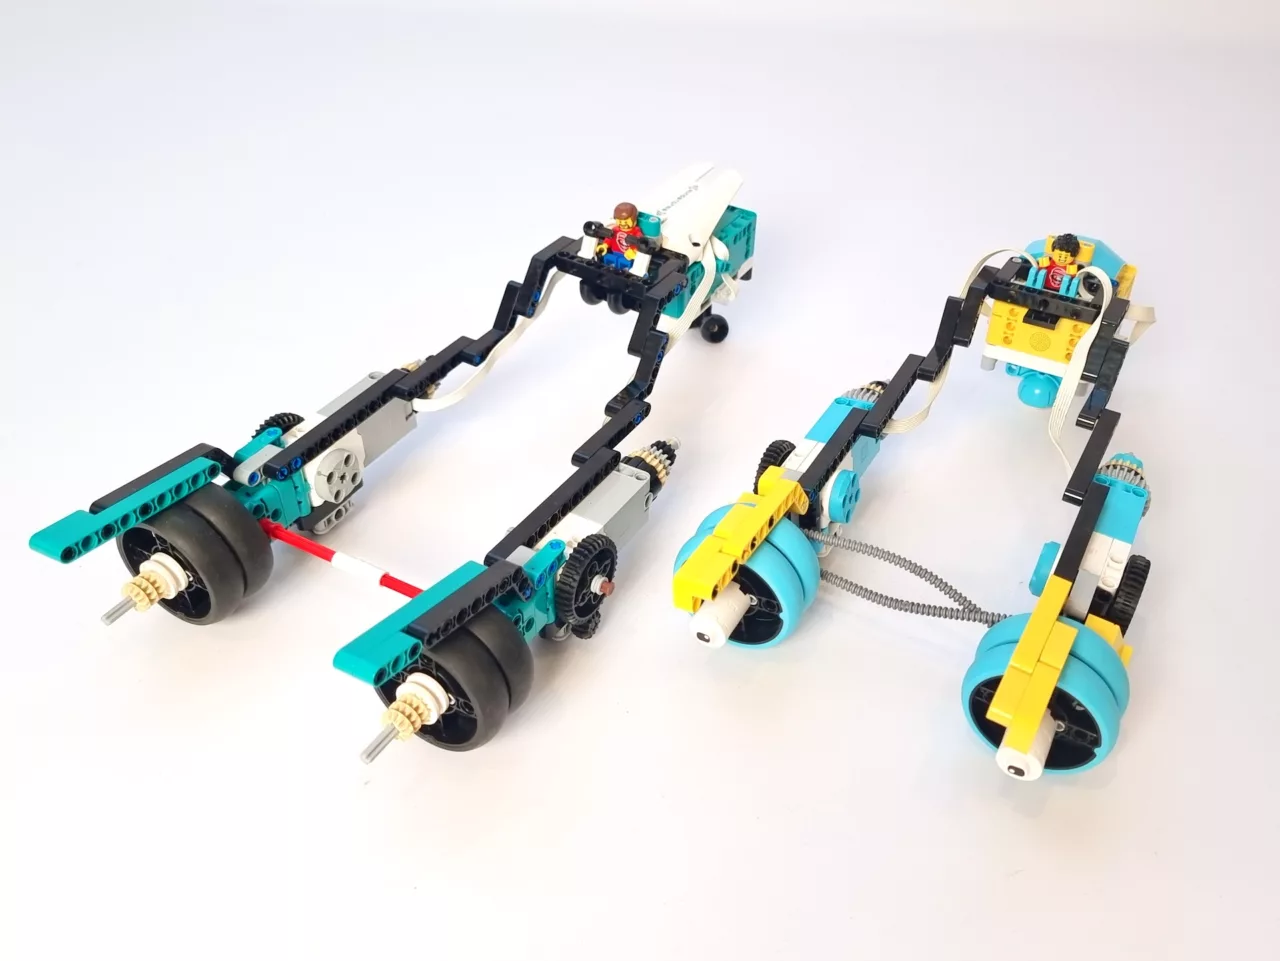
Start by constructing your pod racer. You can unleash your creativity and invent your own design or follow my detailed pod racer building instructions. What I like about the original movie is the great variety in pod racers, so be sure to modify yours for maximum coolness.
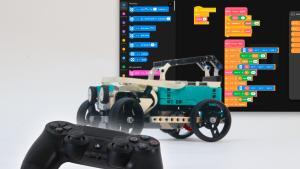
Step 2: Program Your Pod Racer with Pybricks or SPIKE
Once your racer is built, it’s time to breathe life into it through programming. Use Pybricks or the LEGO Spike app to program your racer to respond to commands from the gamepad. I prefer Pybricks. This step turns your static model into a dynamic machine ready for action. If you want to use the LMS-ESP32 and a different controller on Pybricks, I have another blog post about that. You can also use LEGO SPIKE software with LMS-ESP32 for gamepad control, as I explained step-by-step in yet another post.
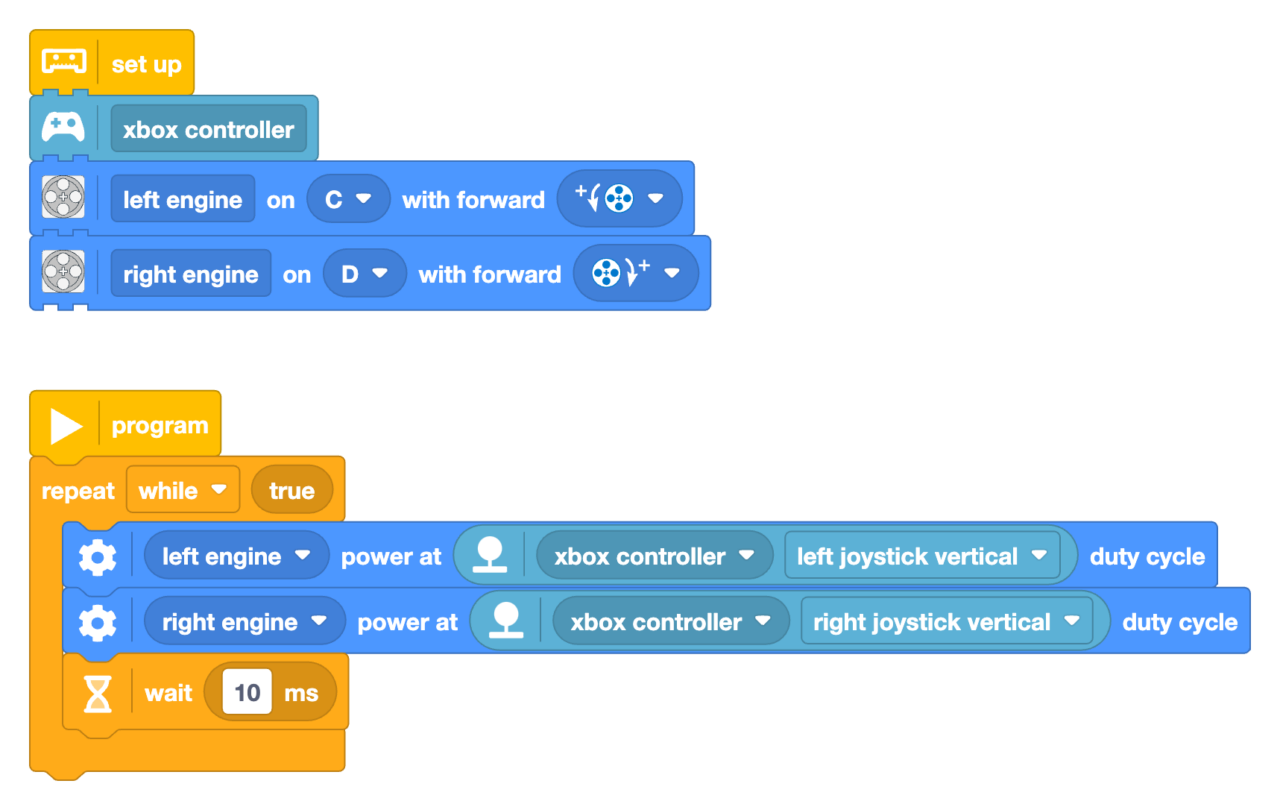
The Pybricks word blocks generate super clean Python code for you. Isn’t that awesome? Here’s the python side of the same file.
from pybricks.iodevices import XboxController
from pybricks.parameters import Direction, Port
from pybricks.pupdevices import Motor
from pybricks.tools import wait

# Set up all devices.
left_engine = Motor(Port.C, Direction.COUNTERCLOCKWISE)
right_engine = Motor(Port.D, Direction.CLOCKWISE)
xbox_controller = XboxController()


# The main program starts here.
while True:
    left_engine.dc(xbox_controller.joystick_left()[1])
    right_engine.dc(xbox_controller.joystick_right()[1])
    wait(10)
Step 3: Set Up lagless Video Streaming for OpenMV H7 en OpenMV RT 1060
Programming your OpenMV camera is next. Configure it to stream video over wifi directly to your smartphone. This setup is crucial as it allows you to see what the racer sees in real-time, making the racing experience truly first-person. Since OpenMV RT and OpenMV H7 use slightly different architecture, we need different scripts. Both scripts tell the LEGO hub they need battery power and then set up a tiny web server that starts streaming images.
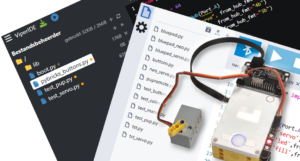
Paste this code into a new file in OpenMV IDE and select Tools > Save open script to OpenMV cam (as main.py)
# Copy this file to OpenMV Cam H7 Plus
# Be sure to also copy pupremote.py and lpf2.py to the camera drive
# Get these files here: https://github.com/antonvh/PUPRemote/tree/main/src

# Be sure to update line 42 and 43 with your Wifi network name and password.

### Setup pupremote code
from pupremote import PUPRemoteSensor, OPENMV, SPIKE_ULTRASONIC
import time
from pyb import Timer

def num(n):
    return n

p=PUPRemoteSensor(sensor_id=SPIKE_ULTRASONIC, platform=OPENMV, power=True)
p.add_command('num',from_hub_fmt="b", to_hub_fmt="b")
p.lpup.heartbeat()
arr=p.lpup.payloads[0]

def cb(x):
    x.deinit()
    p.lpup.uart.write(arr)
    tm = Timer(4,freq=10,callback=cb)

tm = Timer(4,freq=10,callback=cb)
### End of pupremote setup code


### Main program

import sensor
import network
import socket
# Setup sensor
sensor.reset()
sensor.set_framesize(sensor.WVGA)
sensor.set_windowing(0,120,720,360)
sensor.set_pixformat(sensor.RGB565)
sensor.set_vflip(True)
sensor.set_hmirror(True)
# Setup network
SSID = "-----"
KEY = "-----"
HOST = ""
PORT = 80

# Streaming method
def start_streaming(s):
    print("Waiting for connections..")
    client, addr = s.accept()
    # set client socket timeout to 5s
    client.settimeout(5.0)
    print("Connected to " + addr[0] + ":" + str(addr[1]))

    # Read request from client
    data = client.recv(1024)
    # Should parse client request here

    # Send multipart header
    client.sendall(
        "HTTP/1.1 200 OK\r\n"
        "Server: OpenMV\r\n"
        "Content-Type: multipart/x-mixed-replace;boundary=openmv\r\n"
        "Cache-Control: no-cache\r\n"
        "Pragma: no-cache\r\n\r\n"
    )

    # FPS clock
    clock = time.clock()

    # Start streaming images
    # NOTE: Disable IDE preview to increase streaming FPS.
    while True:
        clock.tick()  # Track elapsed milliseconds between snapshots().
        frame = sensor.snapshot()
        cframe = frame.compressed(quality=35)
        header = (
            "\r\n--openmv\r\n"
            "Content-Type: image/jpeg\r\n"
            "Content-Length:" + str(cframe.size()) + "\r\n\r\n"
        )
        client.sendall(header)
        client.sendall(cframe)
        print(clock.fps())

    wlan = network.WLAN(network.STA_IF)
    wlan.active(True)
    wlan.connect(SSID, KEY)

    while not wlan.isconnected():
        print('Trying to connect to "{:s}"...'.format(SSID))
        time.sleep_ms(1000)

    # We should have a valid IP now via DHCP
    print("WiFi Connected ", wlan.ifconfig())

    # Create server socket
    s = socket.socket(socket.AF_INET, socket.SOCK_STREAM)
    s.setsockopt(socket.SOL_SOCKET, socket.SO_REUSEADDR, True)

    # Bind and listen
    s.bind([HOST, PORT])
    s.listen(5)

    # Set server socket to blocking
    s.setblocking(True)

# Init wlan module and connect to network
wlan = network.WLAN(network.STA_IF)
wlan.active(True)
wlan.connect(SSID, KEY)

while not wlan.isconnected():
    print('Trying to connect to "{:s}"...'.format(SSID))
    time.sleep_ms(1000)

# We should have a valid IP now via DHCP
print("WiFi Connected ", wlan.ifconfig())

# Create server socket
s = socket.socket(socket.AF_INET, socket.SOCK_STREAM)
s.setsockopt(socket.SOL_SOCKET, socket.SO_REUSEADDR, True)

# Bind and listen
s.bind([HOST, PORT])
s.listen(5)

# Set server socket to blocking
s.setblocking(True)


while True:
    try:
        start_streaming(s)
    except Exception as e:
        print(e)
        tm.deinit()
breakPaste this into a new file in OpenMV IDE and select Tools > Save open script to OpenMV cam (as main.py)
# Copy this file to OpenMV Cam RT 1060
# Be sure to also copy pupremote.py and lpf2.py to the camera drive
# Get these files here: https://github.com/antonvh/PUPRemote/tree/main/src

# Be sure to update line 48 and 49 with your Wifi network name and password.

### Setup pupremote code
from pupremote import PUPRemoteSensor, OPENMV, SPIKE_ULTRASONIC
import time
from machine import Timer, LED

red_led = LED("LED_RED")
green_led = LED("LED_GREEN")
blue_led = LED("LED_BLUE")

def num(n):
    return n

p=PUPRemoteSensor(power=True)
p.add_command('num',from_hub_fmt="b", to_hub_fmt="b")
blue_led.off()
p.lpup.heartbeat()
arr=p.lpup.payloads[0]
blue_led.on()

def cb(x):
    x.deinit()
    p.lpup.uart.write(arr)
    tm = Timer(freq=10,callback=cb)

tm = Timer(freq=10,callback=cb)
### End of pupremote setup code


### Main program

import sensor
import network
import socket
# Setup sensor
sensor.reset()
sensor.set_framesize(sensor.WVGA)
sensor.set_windowing(0,160,720,330)
sensor.set_pixformat(sensor.RGB565)
sensor.set_vflip(True)
sensor.set_hmirror(True)
# Setup network
SSID = "-----"
KEY = "-----"
HOST = ""
PORT = 80

# Streaming method
def start_streaming(s):
    print("Waiting for connections..")
    client, addr = s.accept()
    # set client socket timeout to 5s
    client.settimeout(5.0)
    print("Connected to " + addr[0] + ":" + str(addr[1]))

    # Read request from client
    data = client.recv(1024)
    # Should parse client request here

    # Send multipart header
    client.sendall(
        "HTTP/1.1 200 OK\r\n"
        "Server: OpenMV\r\n"
        "Content-Type: multipart/x-mixed-replace;boundary=openmv\r\n"
        "Cache-Control: no-cache\r\n"
        "Pragma: no-cache\r\n\r\n"
    )

    # FPS clock
    clock = time.clock()

    # Start streaming images
    # NOTE: Disable IDE preview to increase streaming FPS.
    while True:
        clock.tick()  # Track elapsed milliseconds between snapshots().
        frame = sensor.snapshot()

        cframe = frame.compressed(quality=35)
        header = (
            "\r\n--openmv\r\n"
            "Content-Type: image/jpeg\r\n"
            "Content-Length:" + str(cframe.size()) + "\r\n\r\n"
        )
        client.sendall(header)
        client.sendall(cframe)
        print(clock.fps())

    wlan = network.WLAN(network.STA_IF)
    wlan.active(True)
    wlan.connect(SSID, KEY)

    while not wlan.isconnected():
        print('Trying to connect to "{:s}"...'.format(SSID))
        time.sleep_ms(1000)

    # We should have a valid IP now via DHCP
    print("WiFi Connected ", wlan.ifconfig())

    # Create server socket
    s = socket.socket(socket.AF_INET, socket.SOCK_STREAM)
    s.setsockopt(socket.SOL_SOCKET, socket.SO_REUSEADDR, True)

    # Bind and listen
    s.bind([HOST, PORT])
    s.listen(5)

    # Set server socket to blocking
    s.setblocking(True)

# Init wlan module and connect to network
wlan = network.WLAN(network.STA_IF)
wlan.active(True)
wlan.connect(SSID, KEY)

red_led.off()
while not wlan.isconnected():
    print('Trying to connect to "{:s}"...'.format(SSID))
    red_led.on()
    time.sleep_ms(500)
    red_led.off()
    time.sleep_ms(500)


green_led.on()

# We should have a valid IP now via DHCP
print("WiFi Connected ", wlan.ifconfig())

# Create server socket
s = socket.socket(socket.AF_INET, socket.SOCK_STREAM)
s.setsockopt(socket.SOL_SOCKET, socket.SO_REUSEADDR, True)

# Bind and listen
s.bind([HOST, PORT])
s.listen(5)

# Set server socket to blocking
s.setblocking(True)


while True:
    try:
        start_streaming(s)
    except Exception as e:
        print(e)
        tm.deinit()
        break
Step 4: Optimize Your Viewing Experience
After setting up the camera stream, ensure you can watch it comfortably on your smartphone. For an enhanced viewing experience, consider using the Fully Kiosk Browser app on Android devices; this app keeps the video full screen and prevents the screen from turning off during intense racing moments.
Step 5: Create Your Race Track
Now that your pod racer and viewing setup are ready, build a racetrack right in your home! Use everyday items to mark out lanes and obstacles. Each race can be unique as you redesign and adjust the track for new challenges.
Step 6: Dive Into Full Immersion
For the ultimate racing experience, slide your smartphone into DroneMask2 goggles. This setup enhances visual engagement and deepens immersion, making you feel like you’re truly inside the cockpit of your pod racer.

Why Build a SPIKE FPV Pod Racer?
Building and racing an FPV pod racer offers more than just fun; it’s a rich educational journey that sharpens problem-solving skills and sparks innovation in robotics programming and engineering design principles. It also provides hands-on experience with real-world technologies like computer vision and remote control systems—skills that are highly valuable in today’s tech-driven world.
So why wait? Start gathering your materials today and embark on this exciting adventure of building and piloting your very own SPIKE FPV Pod Racer!