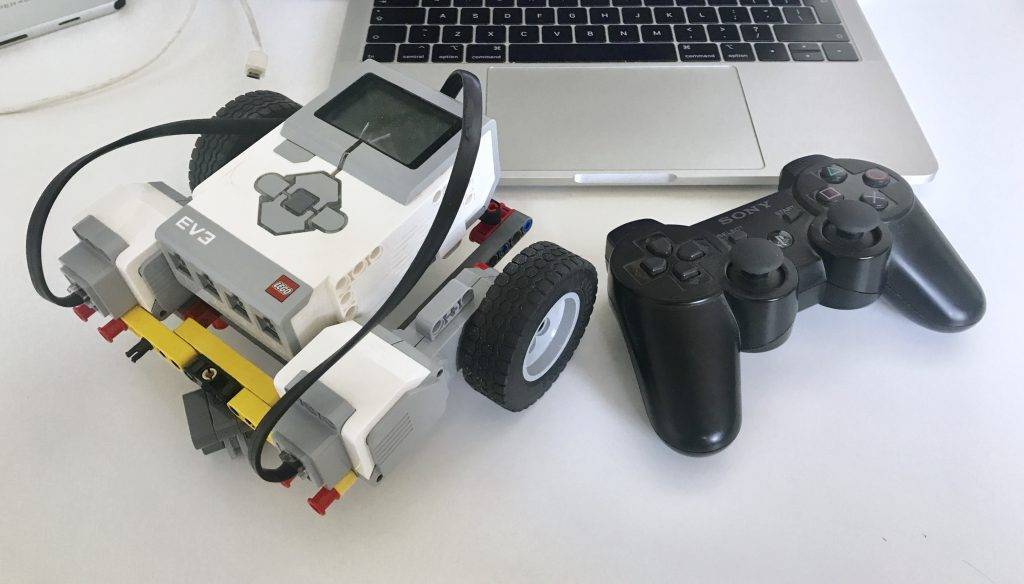
In this article I’m sharing step by step instructions for connecting a PS3 gamepad to an EV3 brick over Bluetooth. It includes Python code to control a simple LEGO MINDSTORMS EV3 robot with a tank steering mechanism. The Python code uses the analog sticks as an input and controls motor voltages. There is also MicroPython code.
Setting up the EV3 to run Python
The easiest way to get started is to follow my guide for installing VS Code and creating the MicroPython SD Card image. Do it and come back here, when you’re set up. It takes about 10 minutes if you have an SD card laying around. LEGO Education has released an easy-to-use version of ev3dev with VS Code integration. That’s what we’ll be using.
Connect the PS3 gamepad
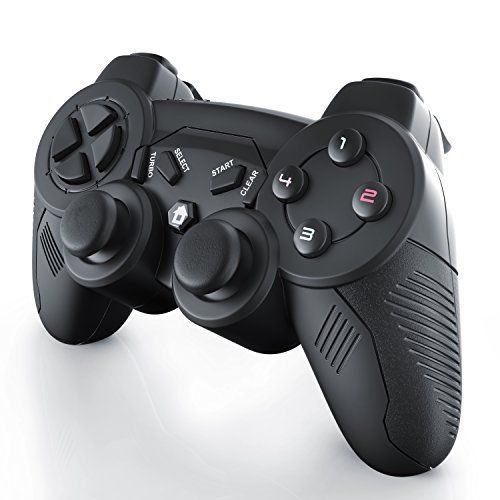
I have an original PS3 Sixaxis controller. They are not for sale anymore, but you can find them second hand. I get many reports that only the original PS3 controllers will work.
Connecting the PS3 controller is a little tricky. Here are the steps.
Time needed: 5 minutes
How to connect a PS3 Sixaxis Gamepad to a LEGO EV3 brick.
- Boot your LEGO MINDSTORMS EV3 brick in ev3dev
If you don’t have a Micro SD card to do so, read the guide to running Python on your EV3 brick.
- Select ‘Wireless and Networks’.
Once the brick has booted from the ev3dev image this item will show up in the menu. Use the up and down buttons on the brick to navigate to it. Use the middle button to select.
- Select ‘Bluetooth’
If the EV3 Brick says ‘Bluetooth not available’, reboot the ev3 brick and start at step 2. To reboot repeatedly press the escape button (on the left bottom side of the screen) until a menu with the options ‘restart’, ‘shut down’ and ‘cancel’ appears.
- Set ‘Visible’ and ‘Bluetooth’ to ‘on’
Navigate to the visibility option and use the middle button to switch between on and off. The square should be filled.
- Connect your PS3 gamepad with the EV3 brick using your regular EV3 USB cable.
Use the small connector in the game pad and the big one in the brick. Wait until the lights on the PS3 gamepad are flashing.
- DON’T PRESS ANY BUTTONS ON THE GAMEPAD
Don’t press any buttons on the brick either. This is really important. So don’t try to pair!
- Remove the USB Cable
Just action of plugging the cable in and waiting for the discovery is enough.
- Press the center Playstation button on the gamepad
It’s the button between ‘start’ and ‘select’.
- Authorize Service HID
On the brick, you see a message: ‘Authorize Service HID?’. Choose Accept. You’re done. It’s connected!
- When reconnecting the PS3 gamepad later, after reboot, start at step 8.
The USB cable is not necessery anymore. Do make sure the EV3 brick is visible in Bluetooth.
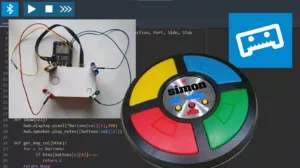
A simple robot for Gamepad control
Just build a simple robot, slam to large motors on a brick and add a tracking wheel. Make sure the left motor is in port B and the right motor is in port C. Here is a picture of my design.

Programming the EV3 in python for remote control
Once you have set up VS Code and the LEGO and ev3dev extensions you can run the code below. Make a new empty project with the EV3 extension if you haven’t yet done so. Remove all of the text from the main.py file and replace it with the program below.
The first line – the shebang – tells the software not to use MicroPython, but Python 3. This is awesome if you want to do Internet of Things, Multithreading and Video stream overlays. Python takes 20 seconds to start however. So for simple robots I advise you to use my MicroPython code for remote control with a PS3 controller. MicroPython starts in mere seconds!
#!/usr/bin/env python3
__author__ = 'Anton Vanhoucke'

import evdev
import ev3dev.auto as ev3
import threading

## Some helpers ##
def scale(val, src, dst):
    """
    Scale the given value from the scale of src to the scale of dst.

    val: float or int
    src: tuple
    dst: tuple

    example: print(scale(99, (0.0, 99.0), (-1.0, +1.0)))
    """
    return (float(val - src[0]) / (src[1] - src[0])) * (dst[1] - dst[0]) + dst[0]

def scale_stick(value):
    return scale(value,(0,255),(-100,100))

def clamp(value, floor=-100, ceil=100):
    """
    Clamp the value within the floor and ceiling values.
    """
    return max(min(value, ceil), floor)

## Initializing ##
print("Finding ps3 controller...")
devices = [evdev.InputDevice(fn) for fn in evdev.list_devices()]
for device in devices:
    if device.name == 'PLAYSTATION(R)3 Controller':
        ps3dev = device.fn

gamepad = evdev.InputDevice(ps3dev)

# Initialize globals
speed = 0
turn = 0
running = True

# Within this thread all the motor magic happens
class MotorThread(threading.Thread):
    def __init__(self):
        # Add more sensors and motors here if you need them
        self.left_motor = ev3.LargeMotor(ev3.OUTPUT_B)
        self.right_motor = ev3.LargeMotor(ev3.OUTPUT_C)
        threading.Thread.__init__(self)

    def run(self):
        print("Engine running!")
        # Change this function to suit your robot.
        # The code below is for driving a simple tank.
        while running:
            right_dc = clamp(-speed-turn)
            left_dc = clamp(-speed+turn)
            self.right_motor.run_direct(duty_cycle_sp=right_dc)
            self.left_motor.run_direct(duty_cycle_sp=left_dc)

        self.motor.stop()

# Multithreading magics
motor_thread = MotorThread()
motor_thread.setDaemon(True)
motor_thread.start()


for event in gamepad.read_loop():   #this loops infinitely
    if event.type == 3:             #One of the sticks is moved
        # Add if clauses here to catch more values for your robot.
        if event.code == 4:         #Y axis on right stick
            speed = scale_stick(event.value)
        if event.code == 3:         #X axis on right stick
            turn = scale_stick(event.value)

    if event.type == 1 and event.code == 302 and event.value == 1:
        print("X button is pressed. Stopping.")
        running = False
        break
Now pressing F5 on the keyboard runs this code on the brick. Neat, huh? If the gamepad is connected well you should be able to steer your robot around.
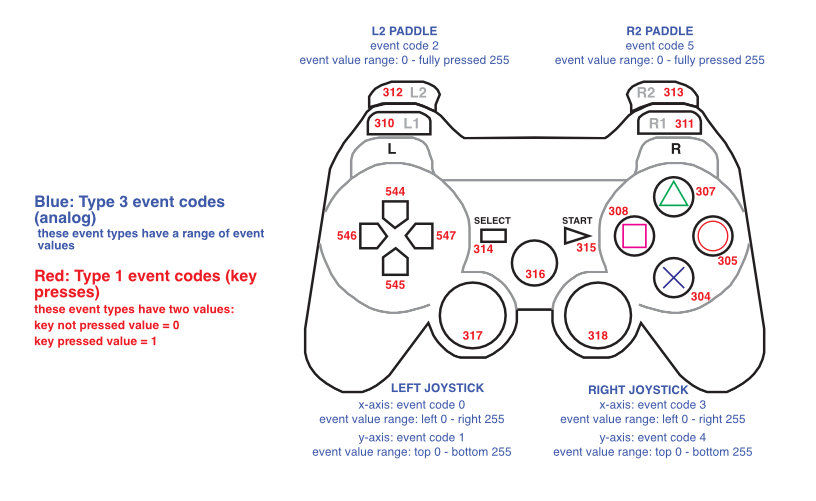
If you want to change the control layout, here’s an overview of the different codes you can use. So if you need the left stick wait for event type 3 and event codes 0 and 1.

In this code the robot move with the right analogue just , can you give me a code to put the move to Forward and backward with the lift analogue + right and lift withe right analogue ?
In the event loop, just catch event codes 0 and 1 instead of 3 and 4. (Lines 73 and 75).
in my brick i have 3 motors > 2 large for move and 1 medium .
and in your code i can just control the large .
i want to keep this method in control the large motors and I want to control the medium motor by x button . 🙁 i am really tired . because i am try a lot .
Hello sir .
Thanks a lot about this video, its help me . 😊
But I want to ask you ..>> how can I control the medium motor by the buttons ?
Now. With your video I can control the large motor ( move ) by the analog.
I want control the large with the analog ( I can now ),and the one medium by the buttons .
Thank you very much for your kindness .
What have you tried to make it run?
Hello Anton:
I get errors from using the new EV3DEV stretch image.
“Unable to import ‘evdev'”,
“Unable to import ‘ev3dev.auto”
“Instance of ‘MotorThread’ has no ‘motor’ member”,
What changes do I need to make from the new language bindings?
#!/usr/bin/env python3
from ev3dev2.motor import LargeMotor, OUTPUT_A, OUTPUT_B, SpeedPercent, MoveTank
from ev3dev2.sensor import INPUT_1
from ev3dev2.sensor.lego import TouchSensor
from ev3dev2.led import Leds
Are you running the code on your computer or on the brick? It should run on the brick. Are you using the sd card image from the link in the article?
I am not using the the Micropython image but the newer EV3DEV.org stretch image. I have been learning the new way of coding the EV3. I think I fixed the motor setup. My problem is how to fix the lines that are connected with this line of code:
import evdev.auto as ev3
Which effects lines like line 32:
devices = [evdev.InputDevice(fn) for fn in evdev.list_devices()]
Make sure not to confuse evdev with ev3dev. You need both.
Hello Anton:
I follewed the step above, but I can’t see Authorize Service HID show up on the brick. And 4 light of my PS3 gamepad were flashing. Does it PS3 gamepad not work?
It happens to me too, sometimes. I then wait until the PS3 gamepad stops flashing and I start over. Did you see the video?
Has anybody been able to get this to work with a non-official PS3 gamepad? I don’t see the “Authorize Service HID” line
I had no luck using a non-official PS3 gamepad. I bought an OEM PS3 Gamepad off ebay and it hooked right up.
He said in the video that the non-official PS3 gamepads don’t work.
Yup. Mine’s on order. Thanks for the heads-up. I look forward to controlling mine when the joypad arrives. Thanks for the confirmation, Patrick
“guide to running Python on your EV3 brick” link leads to “No such page” error page
Thanks! I thought I had a dead link checker installed. Maybe it died.
I spend a couple of evenings trying to connect my brand new ps3 sony gamepad to ev3 brick 🙂 When I attached ps3gamepad with USB cable ps3 started vibrating. And when I pressed sony button on ps3 then ev3 didn’t prompt with “Authorize Service HID”.
Eventually I found that I have SHANWAN clone PS3 (https://github.com/ev3dev/ev3dev/issues/968#issuecomment-544348671)
When I bought true ps3 it connected according to instructions without any issues
Thanks a lot for sharing!
Hi there,
I’m keep getting this mssg on my EV3 ” gdbus.error.org.bluez.error.authenticationtimeout”
Is it bcoz of non-original PS3 gamepad ? Pls help
Probably. Many people have problems with those.
Hi.
This article, and the code you have provided are great! I was able to get this working with a class of students today. We have a question. Is it possible to run the program from the brick directly, or does the program need to be download and run from VS Code every time?
Thanks.
There is a file browser on the brick. You can select your program from there and run it.
Hello Anton,
The python code works perfectly with my EV3 and genuine Sony PS3 game controller.
I had twice tried with OEM non-genuine Sony PS3 controller , believe me it Does Not work ..giving time out errors. With the PS3 controller we can control precisely the EV3 robot. Thank you Anton. God bless you.
You’re welcome!
What do you mean by “OEM non-genuine Sony PS3 controller”? I got a Sony brand PS3 controller in red color and I did get the HID confirmation, but it failed to be recognized by the Python code. Do you think it was the controller?
No. I will post a movie and article soon to explain more. In the mean time read the comments in the code.
Well, I found that my new “Sony” brand PS3 controllers are some SHAWAN clones as Den Orlov mentioned. I didn’t want to get some used PS3 controllers for my son and myself, so I got those new ones on ebay. They looked legit with the proper Sony packaging and labeling on them. I guess they did a good job cloning the whole thing…
Not sure if there’s a way to make them to work, or I will need to look for some other solutions. Will other type of game controllers work with the EV3 (e.g.: Xbox One)?
See my dmesg dump as follows:
……
[ 8367.309175] usb 1-1: new full-speed USB device number 14 using ohci-da8xx
[ 8367.580423] usb 1-1: New USB device found, idVendor=054c, idProduct=0268
[ 8367.580555] usb 1-1: New USB device strings: Mfr=1, Product=2, SerialNumber=0
[ 8367.580602] usb 1-1: Product: PS3 GamePad
[ 8367.580638] usb 1-1: Manufacturer: SHANWAN
[ 8367.654690] input: SHANWAN PS3 GamePad Motion Sensors as /devices/platform/soc@1c00000/ohci-da8xx/usb1/1-1/1-1:1.0/0003:054C:0268.000B/input/input23
……
what’s inside the /proc/bus/input/devices file?
Non genuine Sony PS3 controller, those cheap ones. U should try with original PS3 controller, it works flawlessly.
They were not very cheap and looked the same as the real ones. They may work with the PS3 console, but not for the EV3. Luckily, the seller on eBay is willing to take them back, and I packed them up for shipping already.
Because of that, Anton: I couldn’t do more checking as you suggested on them. Thanks for your help and replies.
FYI: I was able to use some real Sony PS4 controllers to control the EV3. I’m still trying to find out all the buttons mapping code, but I was able to use its joysticks, L/R2 triggers, and the X button for now. It will be nice to figure out how to control the motors with its touchpad 🙂
The controllers are brand new and can be found easily on Amazon.
Starting: brickrun –directory=”/home/robot/mail” “/home/robot/mail/main.py”
Started.
———-
Traceback (most recent call last):
File “/home/robot/mail/main.py”, line 37, in
gamepad = evdev.InputDevice(ps3dev)
NameError: name ‘ps3dev’ is not defined
———-
Exited with error code 1.
why?
thanks!
Looks like the script can’t find the gamepad.
Hi, great video! Is it possible to speed up the motors?
Hello! how to solve a problem? Gamepad is not original.
Starting: brickrun –directory=”/home/robot/mail” “/home/robot/mail/main.py”
Started.
———-
Traceback (most recent call last):
File “/home/robot/mail/main.py”, line 37, in
gamepad = evdev.InputDevice(ps3dev)
NameError: name ‘ps3dev’ is not defined
———-
Exited with error code 1.
Try `cat /proc/bus/input/devices` over ssh and check if your gamepad shows up.
file /proc/bus/input/devices is empty.
Can I fix this?
This means your game pad is not connected. You have to pair it and connect it with the center button.
Your gamepad isn’t connected apparently. Try pairing again.
Hi Anton. Thanks for sharing your knowledge and valuable work. I’m trying the same control with the XBOX One controller. I had to disable the ERTM to be able to connect the Xbox Controller but finally is paired and connected. Now I’m trying to run your code and I only changed the name of the device and seems to be running but it doesn’t run the motors. I’m assuming the events for the Xbox Controller are different that the PS3 controller. Have you tried this? Any Idea where to find the event codes for XboxOne controller? What I’m seeing is that it’s going to be more complicated with Xbox.
Also I want to do control of speed in one motor but position on the other one so I can use it for pinion steering. Thanks
Nice work. The best thing to do is to print every event in the loop. Then try to find out which events correspond to which buttons. How did you disable ertm with persistence? Have you also tried Xbox 360 controllers?
Hi,
what about latest PS4 controller/Gamepad? Will it work as well?
Yes
Hi, so I am trying to make a lego tank but i don’t know how to code it I want it to drive with the analog stick (3 and 4) and i want to control the firing mechanism with the other analog stick and use L2 to fire. Could you please help?
*I meant R2.
What have you tried? Can you share some code? Maybe on GitHub?
Like i don’t know how to add more motors.
Try mynewmotor = Motor(Port.D) or whatever port it is in. Then check for a button up event (value == 0)
In the code for PS4 I use L1 and L2 for trimming the steering. You can look at that code and change it so the buttons do what you want: https://www.antonsmindstorms.com/2020/02/14/how-to-connect-a-ps4-dualshock-4-controller-to-your-mindstorms-ev3-brick-with-bluetooth/
Starting: brickrun –directory=”/home/robot/EGR101″ “/home/robot/EGR101/main.py”
———-
Traceback (most recent call last):
File “/home/robot/EGR101/main.py”, line 31, in
gamepad = evdev.InputDevice(ps3dev)
NameError: name ‘ps3dev’ is not defined
———-
Exited with error code 1.
Code in that area is:
## Initializing ##
print(“Finding ps3 controller…”)
devices = [evdev.InputDevice(fn) for fn in evdev.list_devices()]
for device in devices:
if device.name == ‘PLAYSTATION(R)3 Controller’:
ps3dev = device.fn
gamepad = evdev.InputDevice(ps3dev)
I am unsure of how to adjust this process with my current game controller and am unsure if I am missing a step. Should I try a different game controller?
It only works with an original ps3 controller.
Hi Anton, congratulations for your great original content. Could you post a hack to connect the new Lego 51515 to the old PS3 controller? Thanks and happy new year!
Working on it … it is not trivial.
Hi Anton, I guess it is not worth to try to solve this challenge anymore. Thank you for trying it.
hello, for some reason whenever i try to run the program i get an error that it does not recognise any of the modules whereas ive done every step you have mentioned in your tutorial on youtube. Thanks, i need help ASAP
What modules? Are you running out on the brick or on your PC?
Hi!
I have original gamepad, but this doesnt connect to ev3 brick. Help please!
You have to try a few times. And resetting the gamepad with a paperclip helps too.