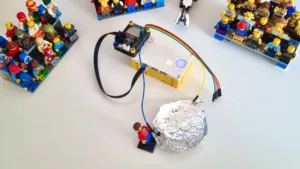
When writing Python on the new LEGO MINDSTORMS and SPIKE hubs, the default methods are somewhat limited. With ‘import hub,’ you can use some hacks to access extra functions on the hub. They are undocumented, but in this article, I’m sharing what I have discovered so far. This is lengthy article full of SPIKE and MINDSTORMS Python hacks, true to the ‘Anton’s Mindstorms Hacks’ name.
The first thing I explain is how to access the internal Inertial Motion Unit, IMU in short. The IMU reports angles, angular rates, acceleration, and position in space. This is relevant for many advanced robots. I also do some advanced button programming, including the led on the main button. The hub has some interesting status reports that I will discuss. Quickly jump to each of the topics:
- Gyro position and rates
- Gestures
- Accelerometer
- Display
- Hub status
- Onboard Sound files
- Buttons
- Motors
- Distance sensor led and reading
- Micropython libraries
- Exiting the script
Currently I have very little information on the motor en sensor methods. They are relatively well documented inside the official apps. I found little need myself to investigate. Maybe I’ll do that in the future. I also plan to find out how to bluetooth methods work. These are harder to reverse engineer.
When you use the hacks in this article, make sure to avoid naming conflicts. The default program template in MINDSTORMS and SPIKE defines a hub object for you. Be sure to rename it remove that line.
# Create your objects here.
hub = MSHub()     # <- !!! remove this or give the MSHub instance a different name !!!

# Then you can safely go
import hub

# Alternatively, you can access the hub object in this article through this method:
from mindstorms import large_technic_hub

# Now all of the hacks below are accessible through the hub object from the large technic hub
# For example getting the gyro rates.
rates = large_technic_hub.hub.motion.gyroscope()
How to get gyro rate and angle in Python on the SPIKE or MINDSTORMS hub
A gyroscope is a sensor that reports rotational speeds. From the continuous measurement of speeds, the SPIKE or MINDSTORMS hub can derive its rotational angle. The angle is an indirect value, and spinning the hub fast can mess that angle up.
In Scratch and default Python, you can only get gyro angles. Using the hub object, you can also access gyro rates. This is how:
 import hub

 # rates in degrees per second
 yaw_rate, pitch_rate, roll_rate = hub.motion.gyroscope()

# filtered, less jittery rates:
 yaw_rate, pitch_rate, roll_rate = hub.motion.gyroscope_filter()

 # angles in degrees
 yaw_angle, pitch_angle, roll_angle = hub.motion.position()
If your hub would be an airplane, the nose is where the USB port is, and the top is the 5×5 led matrix. Like an airplane, the hub can roll from side to side, pitch forward or backward, and yaw horizontally. The positive directions are clockwise for yaw, pull up for the pitch, and roll right.
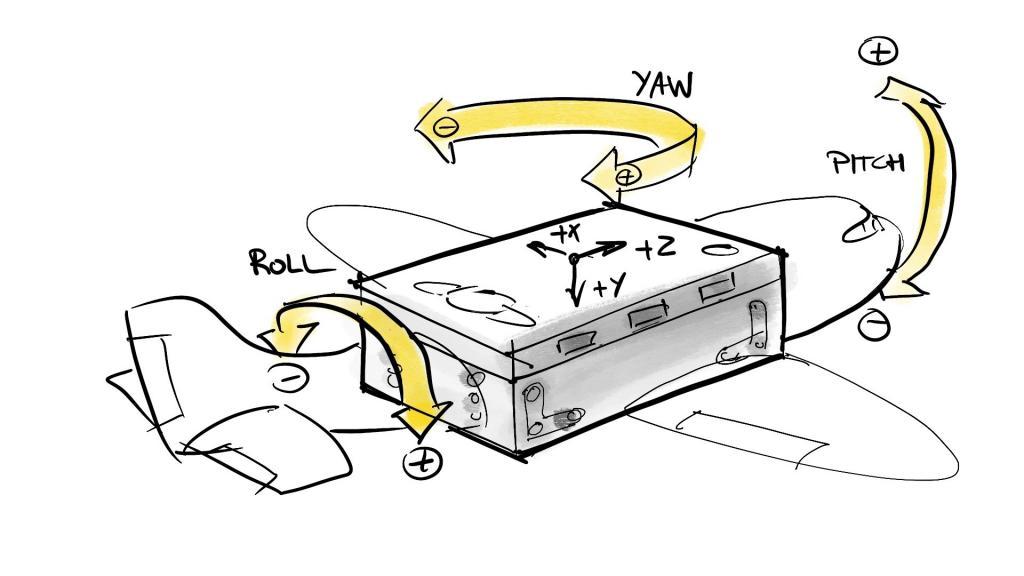
Roll and pitch angles are zero when the hub rests flat on the battery. The zero positions for roll and pitch are irrespective of the hub’s position when you power it on. There is no way to reset pitch and roll zero points.
Yaw is different. The hub sets it to 0 when it powers up. You can also reset yaw yourself. Use this command:
import hub

# Set yaw to zero
hub.motion.reset_yaw()

# Set yaw to a certain angle
hub.motion.preset_yaw(25)
Angle positions for roll, pitch, and yaw are clamped between -179 and 179. The hub never reports 180 or -180! So there is a 2-degree measurement gap somewhere.
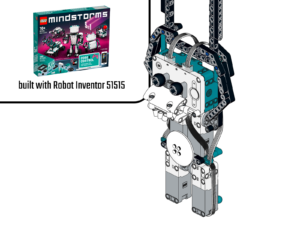
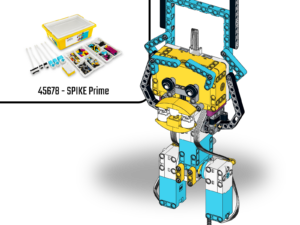
I use the gyro rate in my swinging monkey models if you’re interested in a real-world application. The models come with a well documented Python script and a Scratch/World Block program.
Python gestures in the SPIKE or MINDSTORMS hub
The hub recognizes five gestures. They are DOUBLETAPPED, FREEFALL, NONE, SHAKE, and TAPPED. This is how you check if any of these motions have occurred recently. You can also get the gestures via a callback. The fun thing with the callback is that it reports orientation changes too! So you will know if the hub is picked up, or has fallen over.
import hub

# Check for any new motions since you last checked.
if hub.motion.was_gesture(hub.motion.DOUBLETAPPED):
     print("Someone tapped me twice!")


import hub

# define method
def my_method(args):
     print(args)

# attach it as callback.
hub.motion.callback(my_method)

# If you tilt or tap the hub, it will now print orientations and gestures as soon as they happen.
"""
 leftside
doubletapped
 back
 up
 rightside
 front
 left side
tapped
 back
 down
 back
 left side
 back
 up
 rightside
"""
Accessing the accelerometer with Python in the LEGO hub
An accelerometer measures acceleration. Really! It measures acceleration in three directions. This measurement is useful, even if your robot isn’t moving because the earth’s gravity field also creates an acceleration. If it wouldn’t, your hub would fly off horizontally into space, while you would rotate away with the earth.
Long story short, the accelerometer tells you which direction is down. It’s what your phone uses to auto-rotate the display. Since it measures acceleration, the hub has to lay perfectly still to know precisely where down is.
The SI unit of acceleration is m/s2. That’s the change in velocity per second. In smart devices like LEGO hubs, accelerometers are mostly used to detect where ‘down’ is. That’s why this sensor reports its values in milli-g. That is 1000th of the field of gravity. On average, the field of gravity is 9,81m/s2 on earth. If the hub is flat on its battery, the accelerometer will report (0, 1000, 0). That’s one full g in the ‘down’ direction. If you lay it on its display, it will report (0, -1000, 0)
There are three ways to get accelerometer values:
import hub

# Stabilized, filtered values
left_right, down_up, front_back = hub.motion.accelerometer_filter()

# Jittery, raw values
left_right, down_up, front_back = hub.motion.accelerometer()

# Just the orientation
orientation = hub.motion.orientation()
# Returns a string from this list: ['up', 'down', 'leftside', 'rightside', 'front', 'back']
# These strings are also available as Enums
# e.g. hub.motion.UP == 'up'
If the gravity field is at the left, down, or front side of the brick, you get positive numbers.
The LEGO hub 5×5 display with Python matrices
The standard method of accessing the display in python involves setting the brightness of each separate pixel. Luckily the hub objects provide a better alternative. You can access the display with the show() method. The show method takes either a string or a hub.display.Image as argument.
If you pass a string, it shows all characters in the string with a half-second delay or so. You can also generate and pass images with the Image object. The Image object is not a PIL-like image. It is more like a string with 25 numbers and some semicolons.
The callback returns 0 when the show() or pixel() methods have finished. It is handy if you want to wait until a complete string has been displayed.
You can also rotate the display with the rotation() method. The rotation method takes multiples of 90 as an argument. The argument can be a negative number too. The rotation is relative, so you have to keep track of how you turned the display. It’s a little annoying that you can’t reset the rotation with rotation(0).
You can paint individual pixels with the pixel() method. That method takes three arguments: x,y, and brightness. The brightness is a number between 0 and 9. You can use higher numbers, but the pixel doesn’t get any brighter. At the time of writing there is a bug where calling the pixel() method right after a rotation(), your screen
# Create an image
H = 9
_ = 0

smiley = [
    [_,H,_,H,_],
    [_,H,_,H,_],
    [_,_,_,_,_],
    [H,_,_,_,H],
    [_,H,H,H,_],
]

def matrix_to_image(matrix):
    # Convert an n x m matrix to a hub Image with semicolons
    # E.g.  '09090:09090:00000:90009:09990'
    # With nested list comprehensions. Why? Because I can. :P
    return hub.Image(":".join(["".join([str(n) for n in r]) for r in matrix]))

smiley_img = matrix_to_image(smiley)

hub.display.show(smiley_img)

# Rotate the display upside down
hub.display.rotation(-90)
hub.display.rotation(-90)

# Paint the topleft pixel white
hub.display.pixel(0, 0, 9)
# oops! Another rotation. Watch out here. This seems bugged.

# Add a callback
hub.display.callback(lambda x:print(x))

# Show some text
hub.display.show("Hello from Anton's Mindstorms")
# This also prints a 0 in the console if you added the callback above.
# The callback is handy if you want to know when the display is finally done.
Status reports in the SPIKE or MINDSTORMS hub
The hub has two thermometers, one on the mainboard, one on the battery. Sadly non of them measures room temperature. They are usually 2-3 degrees hotter than the room.
import hub

# The temperature sensors return a float.
temp1 = hub.battery.temperature()
temp2 = hub.temperature()

#The hub returns a full status with
status = hub.status()

# It returns a dictionary like this:
status = {'gyroscope': (3, 6, -3),
    'position': (-16, 60, 0),
    'accelerometer': (-887, -4, 501),
    'port': {'C': [0, 0, 172, 0], 'D': [0, 0, -172, 0], 'B': [None], 'E': [0, 0, -116, 0], 'A': [20, 4, 63, 120, 129], 'F': [0, 0, 36, 0]},
    'display': '09000:09900:09990:09900:09000'
}

# hub.supervision.info() returns a dictionary like this:
result = {
    'continous_current_too_high': False,
    'peek_current_too_high': False,
    'temperature_too_high': False,
    'continuous_current': 148,
    'temperature_way_too_high': False
}
The SPIKE and MINDSTORMS hubs also monitor their electrical loads. This prevents them from bursting into flames or draining the battery with a blocked motor.
Battery status in Python
I haven’t fully researched all battery methods. So far I haven’t had the need for it. The battery has these constants:
- BATTERY_BAD_BATTERY
- BATTERY_HUB_TEMPERATURE_CRITICAL_OUT_OF_RANGE BATTERY_NO_ERROR
- BATTERY_TEMPERATURE_OUT_OF_RANGE
- BATTERY_TEMPERATURE_SENSOR_FAIL
- BATTERY_VOLTAGE_TOO_LOW
- CHARGER_STATE_CHARGING_COMPLETED
- CHARGER_STATE_CHARGING_ONGOING CHARGER_STATE_DISCHARGING
- CHARGER_STATE_FAIL
- USB_CH_PORT_CDP
- USB_CH_PORT_DCP
- USB_CH_PORT_NONE
- USB_CH_PORT_SDP
… and these methods:
- capacity_left()
- charger_detect()
- current() # in mAh, 152 is about idle.
- info()
- temperature()
- voltage()
Onboard Sound in the LEGO SPIKE and MINDSTORMS hubs
You can play sound files on the hub. There’s no need to be connected to a smart device. The speaker is very weak, though, and you won’t hear much.
You can find the sound files on the hub like this:
import hub
import uos

list_of_sounds = uos.listdir("/sounds")
 # This returns a list like this. These are the available sounds at the time of writing.
 # ['menu_click', 'menu_fastback', 'menu_program_start', 'menu_program_stop', 'menu_shutdown', 'startup']

# Now play a sound like this:
hub.sound.play("/sounds/startup")
hub.sound.play(list_of_sounds[0])

# You can also generate sound with a wave and frequency.
frequency = 400
duration_ms = 1000
waveform = hub.sound.SOUND_SIN

# The waveforms options are SOUND_SAWTOOTH, SOUND_SIN SOUND_SQUARE, SOUND_TRIANGLE

hub.sound.beep(frequency, duration_ms, waveform)
Finally, there’s a callback function. I believe it reports when a sound is done playing, but I haven’t verified that.
The MINDSTORMS and SPIKE sound files have 16bit signed integers, but use only 12 bits positive numbers. The minimum value is 0, the max value is 4096. So I ‘amplify’ 0.0625% from +/-32768. Then adjust for the middle (2048) with a dc offset of 0.0625% from max amplitude.
I use sox to convert Wav files to files the hub can read. I then use Spiketools to transfer them. David Gilday has written a nifty way to transfer files with ubinascii. Check his PrimeCuber code to find out how.
sox shake.wav --bits 16 --channels 1 --encoding signed-integer --endian little --rate 16000 shake.raw vol 0.0625 dcshift 0.0625 fade h 0.05 -0.05Buttons in Python on the LEGO SPIKE or MINDSTORMS hub
The hub has four buttons, called center, connect, left, and right. Each of them has five methods: callback(), is_pressed(), on_change(), presses(), was_pressed(). The methods act pretty much as advertised. The callback function here is notable because it calls your function with the time for which the button was pressed.
import hub

# Define callback in a lambda function
hub.button.left.callback(lambda time_ms: print(time_ms))

# Result
# 0 <- at press
# 3860 <-at release, time pressed in ms
Strangely enough, the led behind the main button is not accessible via the button property, but rather directly via hub.led. I used this to turn the led off for my POV clock.
# Hack access to button led
OFF = 0
PINK = 1
PURPLE = 2
BLUE = 3
TEAL = 4
GREEN = 5
LIME = 6
YELLOW = 7
ORANGE = 8
RED = 9
WHITE = 10
GREY = 11

hub.led(OFF)
Motors in the SPIKE and MINDSTORMS hub
The hub has a motor object on each port. If there is really a motor connected, you can use the motor methods as documented here.
The result of the get() method depends on the mode() of the motor. The default mode is [(1,0), (2,2), (3,1), (0,0)]. I assume the first number in each tuple stands for the value (speed, pwm etc) and the second number for the format. However changing the format of the speed reading didn’t change the result for me. I tried modes (1,0), (1,1) and (1,2) and they all returned the same number. I was hoping for a way to read the speed in degrees per second instead of percent.
I use a factor 9.3 to convert from the reported speed reading to degrees per second. It’s not super accurate, but it works most of the time.
The preset() method is named rather weirdly. But it IS very handy! It sets the relative degrees (degrees counted) to a certain number. I use it to make sure that degrees counted has the same zero point as the absolute degrees. See the example code below.
The default() method returns a dictionary with motor settings. I guess you can pass a similar dictionary too. I suspect not all settings are used in the actual motor contol.
import hub

# Use hub.port.[letter]
# For instance, hub.port.E.motor.get() wil get you the motor state on port E

speed, relative_degrees, absolute_degrees, pwm = hub.port.A.motor.get()

hub.port.A.motor.default()
# Returns this:
# {'pid': (0, 0, 0), 'max_power': 0, 'speed': 0, 'stall': True,
# 'deceleration': 150, 'stop': 1, 'callback': None, 'acceleration': 100}

# Reset relative zero like this
motor = hub.port.A.motor
absolute_position = motor.get()[2]
if absolute_position > 180:
    absolute_position -= 360
motor.preset(absolute_position)

# Print motor speed in different formats every second
hub.port.A.motor.mode([(1,0),(1,1),(1,2)])

hub.port.A.pwm(50)

while True:
    print(hub.port.C.motor.get())
    wait_for_seconds(1)
These are the motor constants:
- BUSY_MODE
- BUSY_MOTOR
- EVENT_COMPLETED
- EVENT_INTERRUPTED
- FORMAT_PCT
- FORMAT_RAW
- FORMAT_SI
- PID_POSITION
- PID_SPEED
- STOP_BRAKE
- STOP_FLOAT
- STOP_HOLD
These are the motor methods:
- brake()
- busy()
- callback()
- default()
- float()
- hold()
- mode()
- pair()
- pid()
- preset()
- pwm()
- run_at_speed()
- run_for_degrees()
- run_for_time()
- run_to_position()
Ultrasonic distance and LEDs with the hub.port object in Python
If you just want a sensor reading on a certain port, you can use the get() method on the device object. It returns a list, so you have to unpack it with the zeroth item using [0]. Here’s an example.
Using mode(5) you can control the leds on sensors that have them. Currently, that is the Distance sensor and the Color Sensor.
import hub

dist_sensor = hub.port.C.device

# Turn on the left eye. Left is from your perspective, not the robot's
top_left = 9 #brightness in range 0...9
top_right = 0
bottom_left = 9
bottom_right = 0
dist_sensor.mode(5, bytes([top_left, top_right, bottom_left, bottom_right]))

try:
    from mindstorms.control import wait_for_seconds
except:
    from spike.control import wait_for_seconds

def distance():
    # Get a distance reading in cm
    wait_for_seconds(0.05) # This is an async wait that gives the sensor som e time to get values. You need this in a closed loop.
    distance = dist_sensor.get()[0]
    if distance:
        return distance
    else:
        return 200

print("Distance is ",distance())
Wait, there’s more advanced Python you can access!
The hub runs a version of Micropython. This means that you can import most of these libraries for your advanced programming needs!
cmath– mathematical functions for complex numbersgc– control the garbage collectormath– mathematical functionsuarray– arrays of numeric dataubinascii– binary/ASCII conversionsucollections– collection and container typesuerrno– system error codesuhashlib– hashing algorithmsuheapq– heap queue algorithmuio– input/output streamsujson– JSON encoding and decodinguos– basic “operating system” servicesure– simple regular expressionsuselect– wait for events on a set of streamsusocket– socket moduleussl– SSL/TLS moduleustruct– pack and unpack primitive data typesusys– system specific functionsutime– time related functionsuzlib– zlib decompression
Exiting your Python script when it ends
Currently, Python scripts never end when you run them on the hub, even if you reach the end of the script. The only way to return to the program menu is to press the big button. I found this annoying and confusing. That’s why I end most of my scripts with a raise statement. This forces the script to stop and exit.
raise SystemExitTry… and finally
If you enjoyed this article, please contribute your findings and questions in the comments below. You could also follow me on Facebook or Instagram to keep up to date with my latest findings. Please don’t ask debugging questions.


Hi Anton, this is an excellent article, thank you!
I have been experimenting with a few of these micropython commands myself and your article helped fill in some of my gaps in knowledge. I connect to my Robot Inventor hub via bluetooth and use the python shell/REPL to play with these commands. One thing I have been unable to work out is how to get data generated by the sensors to be exported as a text file to my local machine (a MacBook). I want to use the hub to do various experiments and be able to capture the data from the sensors in a text file so I can analyse it. On EV3 and NXT this can be done by creating an experiment and data-logging the sensor readings. The file can then be transferred back to my Mac. However, I can’t see a way to do this with the Hub. I’m not sure it can store ‘data’ files on the device (probably because of limited memory) or how to get the data from the device to my Mac. At the moment, the only thing I can do is copy and paste the output printed to the REPL …. however, only a limited number of values are shown and I want to capture much more. Do you have any idea how I might capture sensor data from the Hub to a flat file?
When I connect to the Hub via bluetooth and enter ‘help()’ in the REPL I get the display shown in this GitHub repo (https://gist.github.com/bricklife/bf0eab26f23b3ac7e0f59c12fc4a420a). However, I’ve noticed there is now an additional option on the Hub:
CTRL-F — on a blank line, enter filetransfer mode
However, this appears not to work at the moment ;-(
Your blog, website and videos are really great and I enjoy your work and enthusiasm.
Thanks again
d.p.
You can just create files on the hub to log your data, with the python file = open(“mydata.csv”,’w’) command. Then transfer them to your mac with either spiketools/spikerpc or via virtual mount using fuse and mpy-utils. All of that is on GitHub. Those are all ugly hacks, however, and I hope LEGO will add file transfer soon. It is useful for many things.
I found a way to store sensor data on the hub visible for the spike prime app. I guess there are better ways to do the job, but it works (I’m pretty new to python).
For speed reasons I recorded my data in an array and stored them at the end:
try:
uos.mkdir(‘data/linegraph’)
except:
print(‘already exists’)
with open(‘data/linegraph/1’, ‘w’) as file:
for i in range(debugCounter):
file.write(str(debugTime[i])+”,”+str(debugError[i])+”\n”)
file.close()
with open(‘data/linegraph/2’, ‘w’) as file:
for i in range(debugCounter):
file.write(str(debugTime[i])+”,”+str(debugSpeed[i])+”\n”)
file.close()
with open(‘data/linegraph/3’, ‘w’) as file:
for i in range(debugCounter):
file.write(str(debugTime[i])+”,”+str(debugSteering[i])+”\n”)
file.close()
The data is then available beside the dashboard under the tab “data” and can be downloaded by the spike prime app. I think 9 numbers are possible.
Great work! Creative use of the file system. Your python is pretty good! You could use writelines instead of write. Instead of for i, you go something like:
file.writelines([“,”.join([time, data]) for time,data in zip(debugTime, debugSteering)]) This would reduce your program to 6 lines.
I tried to make a csv file but failed to get data from “Data” tap on the spike app. My code is like below. Can I get the solution?
from spike import PrimeHub
import random, uos
hub = PrimeHub()
with open(‘ai_dice/data_log’, ‘w’) as f:
column = 'times' + ',' + 'abc'f.write(column)
for i in range(1, 11, 1):
rand = random.randint(1, 10)
data = str(i) + ',' + str(rand) + '\n'
f.write(data)
hub.speaker.beep(72, 0.5)
In the mean time I made a logger class (the folders and file names are not changeable):
class LogData:
def init(self,logLen, dataTuple):
self.Time = array.array(‘H’,[0]logLen)
self.Data = [dataTuple]logLen
self.Pos = 0
self.DataLen=logLen
self.Start = utime.ticks_ms()
try:
uos.mkdir(‘data’)
except:
pass
try:
uos.mkdir(‘data/linegraph’)
except:
pass
#endo of init
def Update(self,data):
if (self.Pos < self.DataLen):
self.Time[self.Pos] = utime.ticks_ms()-self.Start
self.Data[self.Pos] = data
self.Pos += 1
#end of Update
def Save(self):
for lineNo in range(len(self.Data[0])):
with open(‘data/linegraph/’+str(lineNo+1), ‘w’) as file:
hub.display.show(str(lineNo+1))
for i in range(self.Pos):
file.write(str(self.Time[i])+”,”+str(self.Data[i][lineNo])+”\n”)
file.close()
#end of Save
hub.display.clear()
# end of LogData
#############################
how to use (1000 log points and 6 values to log):
log = LogData(1000,(0,0,0,0,0,0)) # init log class
log.Update((1,2,3,4,5,6)) # update log value (call it up to 1000 times)
log.Save() # stores it in the file system readable by prime App
a csv file doesn’t seem to appear from the data tab on the spike app. My code is like below.
from spike import PrimeHub
import random, uos
hub = PrimeHub()
dice = [1, 5, 4, 2, 6, 3]
index = [0, 1, 2, 3, 4, 5]
with open(‘ai_dice/data_log’, ‘w’, encoding=’UTF-8′) as f:
for i in range(len(index)):

f.write(str(index[i]) + ' ' + str(dice[i]) + '\n')
hub.speaker.beep(72, 0.5)
could I get a solution? Thanks!
Sorry, Markus. Your code doesn’t work on my spike app. 🙁 hmm Could you try to make csv data on the data tap with my code?
sorry I forgot you need to import some stuff:
import utime, array, uos
import hub
It finally and only works when I save data on this route → (data/linegraph/). Thanks 🙂 But now I’m looking for how to set column names on the top in a csv file.
I was trying to get the class example and others working on SpikePrime v2.08.
(1) The example does not work as is. Looks like code is missing something other than just the “” between [0]logLen. Did anyone try the class, was it working for you?
(2) Does anyone have successfully and reliably ported all data to computer? When I use “Export” only exports one table. Do I have to give up on data logging with Python!
So many things to do… this article really needs an update.
Looking for advice on how to move Spike continuously, without stopping between commands? For example, we’d like to move through a maze while continuously adjusting the speed / angle.
Just use a MotorPair.
from mindstorms import MSHub, MotorPair

motor_pair = MotorPair('B', 'A')

while not hub.right_button.is_pressed():

____heading = heading_calculation()

____speed = speed_calculation()

____motor_pair.start(heading, speed)

motor_pair.stop()
Great work! Will need to read this carefully.
You might find some new stuff on my FAQ (https://github.com/maarten-pennings/Lego-Mindstorms/blob/main/ms4/faq.md#python-specific-questions)
Nothing new there ;). But nice FAQ.
How I run “motor.run_to_degrees_counted(180)” for different motors at the same time? So that all motors execute this command at the same time?
Use hub.port.A.motor.run_to_position() instead. That returns immediately, so you can start the next motor right after. Your challenge is then figuring out when they are done running…
It seems the only command that works is motor.start(). All other commands stops the execution until they finished:
‘run_for_degrees’
‘run_for_rotations’
‘run_for_seconds’
‘run_to_degrees_counted’
‘run_to_position’
Dear Anton, I have just installed the Prime App and made my first Python program. Can you tel mee how the code hints can be activated.
It is activated all the time. However, it is not as smart as VS Code/Intellisense. It only suggests variables you typed before and classes you explicitly imported. It will only suggest “.run_at_speed()” after you have written “mymotor.run_at_speed()” once before. I hope LEGO will improve this and add autocompletion with documentation, docstring parsing, and argument explanation….
Hi Anton
Congratulations, excellent work. This article helped a lot and gave me several design ideas.
Congratulations, excellent work. This article helped a lot and gave me several design ideas.
Do you know if it possible to code threads or to run multiple timers in mindstorm python?
You can run multiple of my AMHTimer() in parallel. Threads not at the moment.
Lego has now documented this API here:
https://lego.github.io/MINDSTORMS-Robot-Inventor-hub-API/index.html
I have both an Inventor and a Spike Hub and am very curious to know what differences might exist in hardware/firmware.
I noticed at least one difference between this article and the API on my Inventor Hub: hub.motion.callback(…) has become hub.motion.gesture(callback=…).
Thanks.
Hi Anton,
Fantastic article, thank you. I’m learning MicroPython as my first object-oriented language. Do you know if there’s a way to break Spike Prime code down into modules? My code is now ~1000 lines and unwieldy. Ideally, I would like to separate out the classes into different tabs.
Also, is there a way to shut off some of the background functions of the hub? I think they may be consuming random number of CPU cycles, sometimes in short bursts.
Check this library of mine. I made SPIKE module. https://github.com/antonvh/LEGO-HuskyLenslib
If you kill the BG processes you will also loose a lot functionality, like uart and bluetooth.
Excellent work! Have you done any research into connecting the Lego 88010 remote via LWP3? Would be cool to have a simple remote like that to interact with the models. Pybricks is great for this, but i find it a bit limiting at times..
No I haven’t. Cool idea! It shouldn’t be so hard.
Anton, thank you for useful information!
My students loved your remote control spike prime project. We are working on adding a distance sensor and a motor to turn it into a game.
Hi Anton,
I was just wondering what other modes there are for the distance sensor.
Thank You
You can try to print the result of ‘hub.port.A.info()’ or try to find here: https://lego.github.io/MINDSTORMS-Robot-Inventor-hub-API/?fbclid=IwAR27HQ9LBvq_-X80k25NU1j8idNNQhbxdrb7RnPuXlyfxd2wbyG57o-xgXI
PID?
Hi Anton,
A great post above.
Something I’m hoping you or another reader may be able to assist with.
In your sample code “Control ultrasonic sensor leds in Python” you demonstrate using mode 5 of the Distance sensor to dim/switch off the LEDs and then whilst still in mode 5 you are able to get a distance reading.
I’m trying to do something similar with the Color Sensor. I’d like to dim the brightness and then take a reading. The reason is that from a height of 8-10mm from a surface both white and silver foil have a reflected value between 98-100%. This makes them virtually indistinguishable. I’d like to be able to dim the LEDs in the hope of make it easier to distinguish between white and silver.
In my sample code below, I end of having the following issues:
1) If I stay in mode 3, when I use COLORSensor.get()[0] it returns the brightness level of the first LED not the reflected light mode.
2) If I swap to mode 1, the LEDs revert back to full brightness and I then get the same high reading of 99 on white for each iteration.
Can you see a way to dim the LEDs and get a usable reflected light reading using code?
from hub import port,
from spike.control import wait_for_seconds
COLORSensor = port.E.device
Brightness = 9
while Brightness >= 0:
COLORSensor.mode(3) # set mode to light
led1 = Brightness #brightness in range 0…9
led2 = Brightness #brightness in range 0…9
led3 = Brightness #brightness in range 0…9
COLORSensor.mode(3,b''+chr(led1)+chr(led2)+chr(led3))

#COLORSensor.mode(1)

wait_for_seconds(0.2)

print("Brightness = ", Brightness, "Reading = ", COLORSensor.get()[2])

wait_for_seconds(0.5)

Brightness -= 1  # Increment brightness
I’m afraid you can’t. If I do a reading while in mode 5, internally, the sensor reverts to reading mode implicitly. I suggest adding a piece of paper or scotch tape over the LEDs to make them less bright. 😉
Hi Anton
A great post above.
Something I’m hoping you or another reader may be able to assist with.
In your sample code “Control ultrasonic sensor leds in Python” you demonstrate using mode 5 of the Distance sensor to dim/switch off the LEDs and then whilst still in mode 5 you are able to get a distance reading.
I’m trying to do something similar with the Color Sensor. I’d like to dim the brightness and then take a reading. The reason is that from a height of 8-10mm from a surface both white and silver foil have a reflected value between 98-100%. This makes them virtually indistinguishable. I’d like to be able to dim the LEDs in the hope of make it easier to distinguish between white and silver.
In my sample code below, I end of having the following issues:
1) If I stay in mode 3, when I use COLORSensor.get()[0] it returns the brightness level of the first LED not the reflected light mode.
2) If I swap to mode 1, the LEDs revert back to full brightness and I then get the same high reading of 99 on white for each iteration.
Can you see a way to dim the LEDs and get a usable reflected light reading using code?
from hub import port,
from spike.control import wait_for_seconds
COLORSensor = port.E.device
Brightness = 9
while Brightness >= 0:
COLORSensor.mode(3) # set mode to light
led1 = Brightness #brightness in range 0…9
led2 = Brightness #brightness in range 0…9
led3 = Brightness #brightness in range 0…9
COLORSensor.mode(3,b''+chr(led1)+chr(led2)+chr(led3))

#COLORSensor.mode(1)

wait_for_seconds(0.2)

print("Brightness = ", Brightness, "Reading = ", COLORSensor.get()[2])

wait_for_seconds(0.5)

Brightness -= 1  # Increment brightness
Thanks for having a look at it. At least now I know it isn’t an issue with my code. Can you tell if it is something that LEGO themselves could fix at the firmware or micropython library level? Or do you know if it is a limitation of the color sensor design?
I think it is deep in the sensor firmware. One last ditch try:
if the sensor is in port E, do this right before the read:
port.E.pwm(-50)
Thank you Anton, that seems to work perfectly.
The Color Sensor’s LEDs must be powered from the higher voltage (7.2v I think) M1 and M2 PWM pins. Interestingly, once set the pwm setting persists. So, it doesn’t need to be done just before taking the reading.
In my test, the greatest distinction between white and silver was at a pwm setting of -70.
Strangely, when playing around with the pwm setting the colour sensor can start to emit a high pitched whine when between -20 to -90 but is silent at 0 and -100.
So three quick questions:
1) Do you have any idea why the color sensor whines when using pwm?
2) Is using pwm like that bad for the sensor? Will it shorten its lifespan?
3) How did you know to make the PWM setting a negative number? Positive PWM settings between 0-100 all turn the LEDs completely off. But negative PWM settings between 0 to -100 incrementally dim the LEDs.
=========================================================
Simple Example code below for anyone else interested in testing
from hub import port,
from spike.control import wait_for_seconds
COLORSensor = port.E.device
Brightness = 0
COLORSensor.mode(1)
while Brightness >= -100:
port.E.pwm(Brightness) #Dims the LEDs
wait_for_seconds(0.2)
print(“PWM/Brightness = “, Brightness, “Reading = “, COLORSensor.get()[0])
wait_for_seconds(0.5)
Brightness -= 10 #Increment brightness
1) Because, sadly, LEGO choose to work with a 1200Hz chopper to control voltage. If they had used anything above 20kHz it would have been inaudible.
2) No. It only hurts the ears.
3) In my LMS-ESP32 board (see shop) I also need negative voltage to power RGB leds.
With the access to the accelerometer have you found any code like the advanced movement block:
Set Movement Acceleration to (fast, balanced, smooth, slow, very slow)
Our FLL team would like to work in Python, and the Set Movement Acceleration is something they are really missing as it allowed them to really crank up the speed on longer runs.
It’s best to use pybricks if you want this. Great acceleration control!
Does the PyBricks also work with VSCode? The kids started down the path of PyBricks last year with the EV3; but learning curve was quite steep. This year, for the Spike the kids just got VS Code working with Win10; using the Extension from Peter Staev https://github.com/PeterStaev/lego-spikeprime-mindstorms-vscode; and watching your Monkey Swing Video https://www.youtube.com/watch?v=b8MBiOQyz3I&t=768s.
That extension can be found in the extensions avaiable from VSCode. The only part that’s not clearly document is the ctrl+shift+p and then typing LEGO to see the extra commands like format header, and upload to hub specific to spik. The ‘upload to Hub’ is based on Nutki, and seems to work well even over bluetooth. If there is something similar for PyBricks, I’m sure they’d be happy.
For accelerations, checked the pybricks API — under robotics module https://docs.pybricks.com/en/v3.1.0/robotics.html there is the ‘settings’ which has acceleration. Looks very cool, especially with the turn acceleration setting. I’ll have my son give it a try.
He mentioned that it looks similar to the acceleration referenced in the lego robot inventor documentation https://lego.github.io/MINDSTORMS-Robot-Inventor-hub-API/class_motorpair.html in the motor pair section “run_for” run_for_degrees(degrees: int, speed_0: int, speed_1: int, max_power: int, acceleration: int, deceleration: int, stop: int) → None —> This seems to be absent from the Spike Prime. Have you seen any API documentation specifically for Spike?
Hi Anton
Thank you for some great information.
I have moved to VS Code for my Spike Prime programming using the Spike extension.
One issue I have encountered is that pressing the center button results in a Hub soft reset. This happens no matter if I upload the program from VS Code of from the Spike Windows app.
Have you seen the same?
Best regards
Carsten
Never happened to me. Maybe it is sticky? Some dirt in between?
Hey Anton,
Is it possible to make the color sensor display a certain color like the LED behind the center button (i.e., If I wanted it to display green)
No you can’t. Spike essentials has 3×3 matrix light widget sensor thingy, however. And if you like soldering, you can get a set of RGB lights on my website.
Hi Anton. Anything you can add regarding the utime import? Does the spike have a persistent clock? Is there an easy way to sync the hub time to a PC clock when they connect?
No persistent clock. You might want to consider an lms-esp32 from my website. It can connect to an ntp server over wifi and share the time with the SPIKE hub through serialtalk or uartremote.
Hi Anton, it’s another great article! Do you know how to use Machine Learning extension with Spike Prime?
THank you!
Tran
Yes. But I don’t like it. I prefer to make my own AI in python. 😀
Hi Anton, this is the best info I read so far on spike prime/python. I have a few basic questions and hope you and/or the other experts here can help answer:
1. Our team had been working with EV3 brick using pybricks 2.0 (on microSD) and VS code and it worked almost perfectly. Now (with ev3 brick failing/broken) we are considering to move to spike prime. Would spike prime + pybrick 3.0 + vs code work together nicely, reliably, just as ev3 + pybricks 2.0 + VS Code?
2. The “native” spike prime app supports python, but it’s a web app, does it support multiple python files in one project, is there any way to work with version control, e.g., git?
3. For pybricks, there is now the “pybricks code”, which seems to work the same way as the spike prime app. So does the “pybricks code” support multiple files in a project, would it readily work with a version control system like git?
Thanks in advance!
Thanks for the insights! Looks like pybricks code is a decent starter, we’ll see if how smooth the pybricks vscode extension works for spike prime.
I asked a similar question in the pybricks subreddit just a couple of days ago. Sounds like the answers are yes, you use pybricks + VS code (yay!). It also supports multiple files, which is great for master programs.
https://www.reddit.com/r/pybricks/comments/105nsxr/comment/jjzmkv5/?utm_source=reddit&utm_medium=web2x&context=3
That’s great news, thanks! On EV3, it worked really well for our team and the vscode support for git is a big plus for team collaboration and version control.
So I have a question, I have installed the pyhub-stubs extension on vscode and I can control my hub with python standard, I can upload programms and read sensors etc. But I want to be able to save the reads of the sensor to a file, it doesn’t matter what file (JSON, txt, etc.), just if i can save it and read it with a different python file not connected to the hub, and use the data to graph the data. So is there a way to do that?
By the way, I found out that by using os.listdir(), I get a list of files and folders, including the files i tried to create using: “with open(‘test.txt’, ‘w’) as f:”. So the files I tried to create indeed got created but not local on my computer. So the question stands, how can I get the files local?
You can use Thonny or rshell.
Could you mayby explain how, because I still don’t really know how to make the python file uploaded to the hub create a file and store it on my computer instead of on the storage built in the hub?
Hi Anton,
Is it possible to get the torque, force or other feedback from the hub about motor to understand if overload/stalled situation like when an attachment has hit a hard stop.
started trying to use device.get_duty_cycle or motion_sensor.angular_velocity but not sure if they will give info as well as how to check continuously.
You can read motor speed and voltage. High voltage + zero speed = stall.