In this article, I’ll share some MINDSTORMS Python code to help you coordinate motor movements. Synchronized motors are essential when you make robots dance or walk. Legs and arms need to move in unison for the robot to advance. I have abstracted the process to control motor positions based on a single input parameter. This Python Motor Synchronization method makes it real simple for you to make all kinds of robots walk and move.
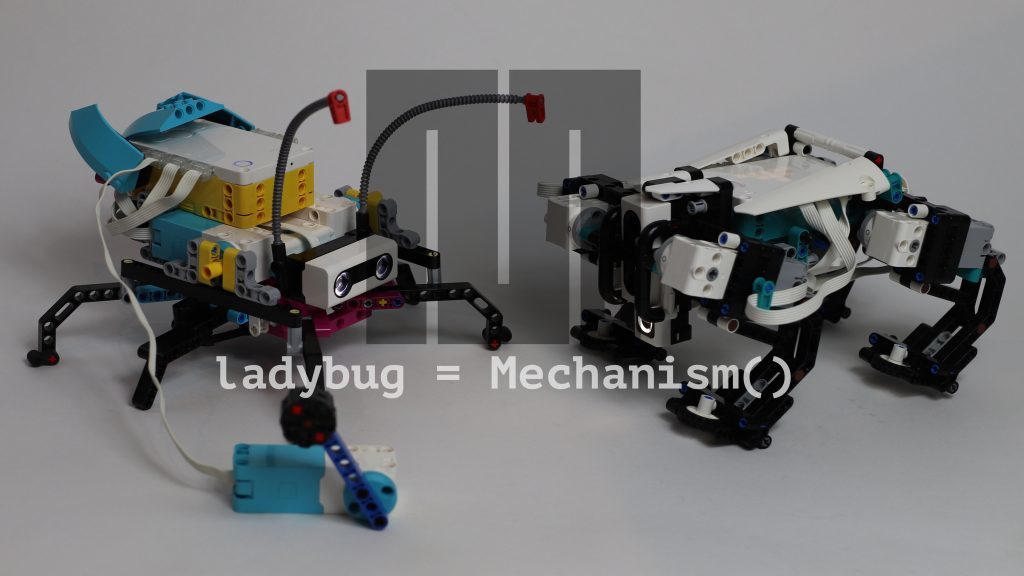
You can see in the video how I linked all motor movements to a single number. If I change that number with the external motor, you see the animation unfold. I use this method in the SPIKE Prime Ladybug, 51515 Tars, the Swing Monkey, and LEGO MINDSTORMS Gelo.
One point in time, one position for SPIKE Motors
The basic idea of Python Motor Synchronization is that every single point in time corresponds with a motor position. Based on that idea, I searched for mathematical functions that calculate this relation. I wanted functions that would take time as an input and give me a motor position in degrees as an output. Then I could scale this up to as many motors as the LEGO MINDSTORMS hub can support. If every motor has a time-function, I can steer each motor to its desired position at any point in time.
The Mechanism() class for LEGO MINDSTORMS/SPIKE Python Motor Synchronization
To control all motors with functions, I wrote a Python Mechanism class. It takes two lists as it’s input: a list of motors and a list of functions. Once you have set up the Mechanism, all you have to do is feed it the time. The class will then set all motor powers according to their distance from the desired position at that point in time. Make sure to either keep updating motor powers in a loop or stop them completely. If you stop updating them, they will keep running at the last calculated motor power.
The bit of code below is the core of what it takes to make Gelo walk with Python code.
PERIOD = 1000 #ms

move_a = linear(-360/PERIOD)
move_b = linear(360/PERIOD, offset=180)
move_c = linear(-360/PERIOD, offset=180)
move_d = linear(360/PERIOD)

motor_functions = [move_a, move_b, move_c, move_d]
motors = [Motor('A'), Motor('B'), Motor('C'), Motor('D')]

gelo_walk = Mechanism(motors, motor_functions)
timer = AMHTimer()
while True:
    if EXTERNAL_CRANK:
        gelo_walk.update_motor_pwms(EXTERNAL_CRANK.get()[1])
    else:
        gelo_walk.update_motor_pwms(timer.time)
How to think of LEGO motor functions
As motors rotate clockwise, their position keeps ‘increasing.’ After one revolution, a motor position is 360; after two revolutions, it is 720. Outwardly, it might look like it is in the same position again, but the motor has continued counting on the inside. The difference between the inside counter and outside position makes motor functions a bit hard in the beginning. To illustrate this, I have made some graphs with typical motor functions.
The linear motor function in LEGO Python
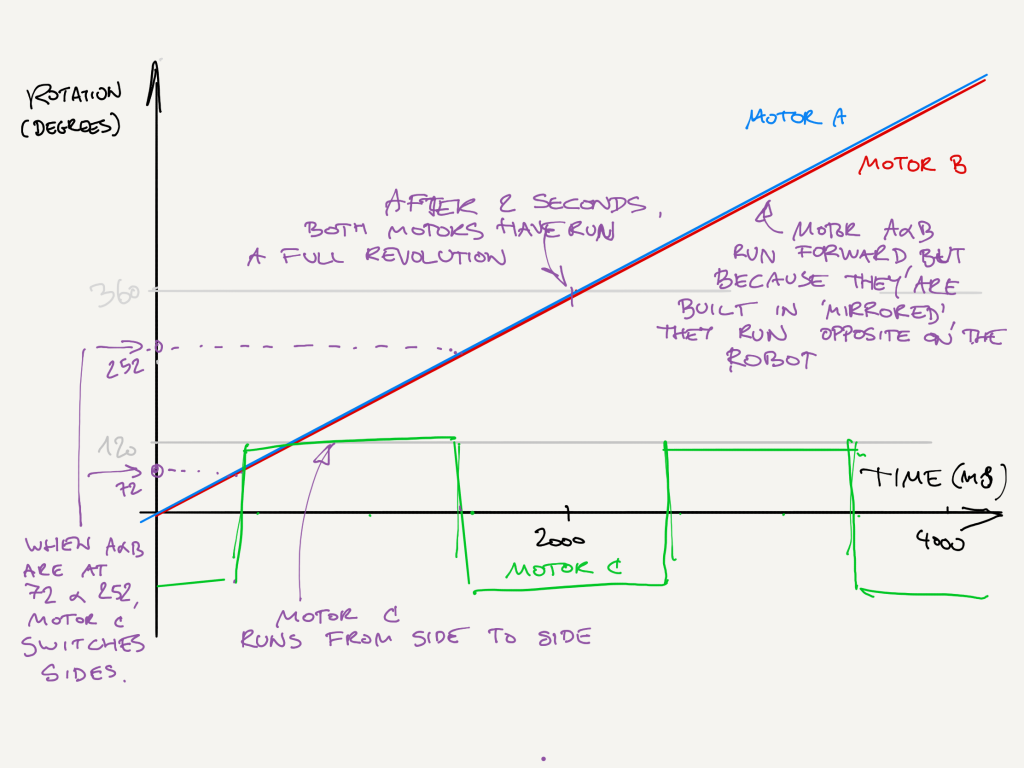
The legs of Gelo and the outer legs of the Ladybug have a linear function. Linear means the motors run at a constant rate. Every unit of time, they rotate a unit of rotation. In my Gelo python program, the motors rotate 360 degrees per second. That is 360º/milisecond or 0.36º/ms.
In this graph, I have plotted all Gelo motor functions. The slope of the line is a measure of the speed of the motor. Steeper is faster. If the line goes up, the motor runs forward. If the line goes down, it runs backward. The intersection with the Y-axis shows how far the motors are apart.
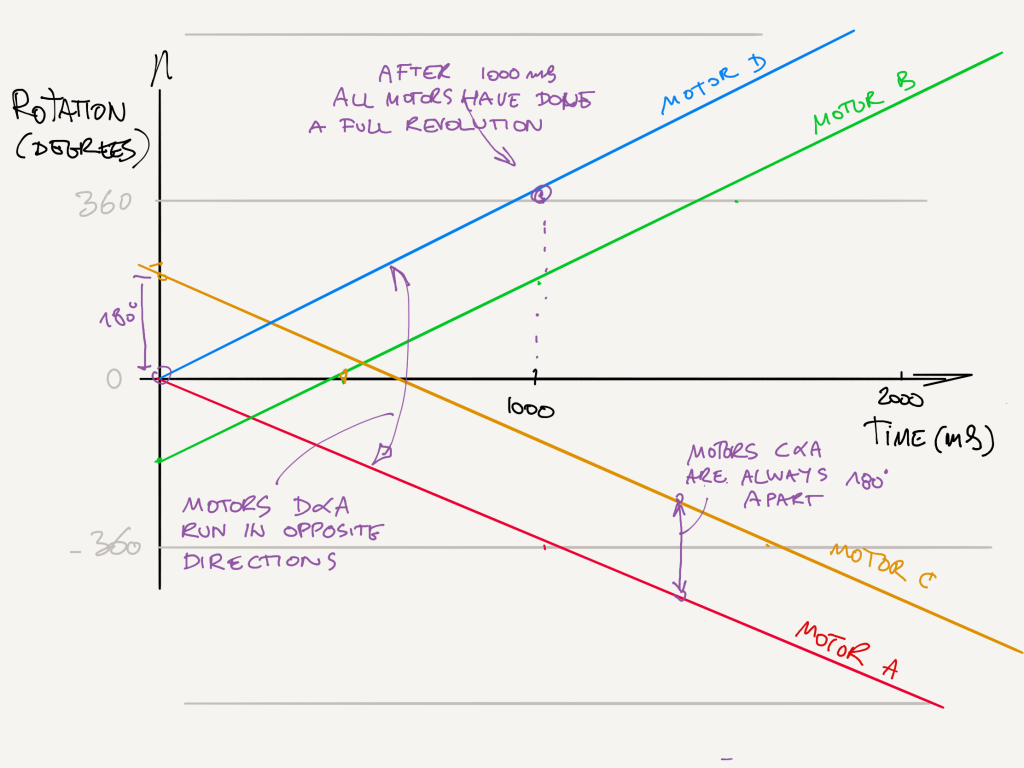
In this graph, you can see that motors A and C run backward. You can also see that motors A and B are 180 degrees apart. The same goes for motors C and D.
The Mechanism class ‘pulls’ motors to the right position at every point in time. If they are ahead, they will slow down or even reverse. If they are behind, they will increase the motor power.
The wave function for dancing Python MINDSTORMS robots
Unlike a linear function, the sine wave makes the motor run back and forth. The most commonly used wave is a sine wave. It is a smooth wave that looks very natural. I have used a sine wave in the Catfish and FREE Lizard models to make their bodies curve from side to side. I have also used the wave function to make robots dance!

Another type of wave is the block wave. It just shoots from one extreme to the other. I have used a block wave for the middle legs of the Ladybug. The block wave was better in this case because I wanted the Ladybug to lift its legs real quick. Quick leg lifting meant that motors A and B, which do the forward-backward movement, do not have to wait and can run with a linear function.
Here is a bit of code that generates a block wave.
def back_and_forth(ticks):
    # at time 0, 50% and 100% both legs are neutral
    # at time 25% both and 75%, the legs are opposed
    # Just before time 25% the motor should start tilting to one side,
    # wait until the legs have dragged the robot forward
    # and then tilt the robot to the other side.
    #120 |        **********************
    #    |        *                    *
    #    0 |----------25---------50---------75--------- 100%
    #    |        *                    *
    # -120 |********                   **********

    phase = ticks % PERIOD
    if 0.2 * PERIOD < phase < 0.7 * PERIOD:
        return 120
    else:
        return -120
Metafunctions: functions that return functions
The cool thing about Python is that everything is an object. Since methods – Python functions – return any object, they can also return other methods! With this Python trick, we can, for instance, create a wave metafunction that returns a wave function with an offset, amplitude, and wavelength. The resulting method is a method we can use for the Mechanism class to control motors. I have also made linear metafunction that helps me set a time delay or a degree offset. Below are some examples.
def linear(factor, time_delay = 0, offset = 0):
    """
    Returns a function that is a linear proportion to an input.
    """
    y0 = - time_delay * factor + offset
    def function(x):
        return x * factor + y0
    return function

f = linear(0.5, offset=300)
motor_position_after_1000_ms = f(1000)
# Returns 800 (0.5*1000+300)
Full Python Mechanism Class for Synchronizing motors
Here is a demo where I use the Mechanism class multiple times. Download the Ladybug building instructions to see this program in action for yourself. First, I initialized the class with motor functions that make the Ladybug run forward. By manipulating time in my AMHTimer class, I can have the mechanism accelerate and run backward without any awkward leg repositioning. I disliked that in the Word Blocks program for Gelo.
After running forward and backward, I re-intitialize the program with new functions for turning on the spot. In theory it’s also possible to make soft bends, if you control the block wave of the middle legs with a global variable. By lifting the legs sooner and making a shorter haul on one side, this model could turn.
Finally, here’s the full Mechanism class. Because of the single file limitation in SPIKE and MINDSTORMS projects, you have to copy and past this inside your programs. The size of the Mechanism and Timer classes means that you have to scroll down quite a long way for the core program.
import hub
import utime
import math


# Metafunction of linear function
def linear(factor, time_delay = 0, offset = 0):
    """
    func = linear(25)
    func(2) = 50
    """
    y0 = - time_delay * factor + offset
    def function(x):
        return x * factor + y0
    return function

# Metafunction for sine waves
def sine_wave(amplitude=100, period=1000, offset=0):
    """
    func = sine_wave()
    func(1000) = 0
    """
    def function(x):
        return math.sin((x-offset)/period*2*math.pi) * amplitude
    return function

# Metafunction for block waves
def block_wave(amplitude=100, period=1000, offset=0):
    """
    func = block_wave()
    func(0) = 100
    """
    def function(ticks):
        phase = ticks % period
        if offset < phase < offset + period//2:
            return amplitude
        else:
            return -amplitude
    return function


# Better timer
class AMHTimer():
    """
    A configurable timer which you can start, reverse, stop and pause.
    By default, it counts milliseconds, but you can speed it up,
    Slow it down or accelerate it!
    You can also set the time and reset it.
    You can even run it in reverse, so you can count down until 0.
    It always returns integers, even when you slow it way down.


    Author:
        Anton's Mindstorms Hacks - https://www.antonsmindstorms.com

    Usage:
        my_timer = AMHTimer():
        my_timer.rate = 500  # set the rate to 500 ticks/s. That is half the normal rate
        my_timer.acceleration = 100  # Increase the rate by 100 ticks / second squared
        my_timer.reset()  # Reset to zero. Doesn't change running/paused state
        now = mytimer.time  # Read the time
        mytimer.time = 5000  #Set the time
    """
    def __init__(self, rate=1000, acceleration=0):
        self.running = True
        self.pause_time = 0
        self.reset_at_next_start = False
        self.__speed_factor = rate/1000
        self.__accel_factor = acceleration/1000000
        self.start_time = utime.ticks_ms()

    @property
    def time(self):
        if self.running:
            elapsed = utime.ticks_diff( utime.ticks_ms(), self.start_time )
            return int(
                self.__accel_factor * elapsed**2 +
                self.__speed_factor * elapsed +
                self.pause_time
                )
        else:
            return self.pause_time

    @time.setter
    def time(self, setting):
        self.pause_time = setting
        self.start_time = utime.ticks_ms()

    def pause(self):
        if self.running:
            self.pause_time = self.time
            self.running = False

    def stop(self):
        self.pause()

    def start(self):
        if not self.running:
            self.start_time = utime.ticks_ms()
            self.running = True

    def resume(self):
        self.start()

    def reset(self):
        self.time = 0

    def reverse(self):
        self.rate *= -1

    @property
    def rate(self):
        elapsed = utime.ticks_diff( utime.ticks_ms(), self.start_time )
        return (self.__accel_factor*elapsed + self.__speed_factor) * 1000

    @rate.setter
    def rate(self, setting):
        if self.__speed_factor != setting / 1000:
            if self.running:
                self.pause()
            self.__speed_factor = setting / 1000
            self.start()

    @property
    def acceleration(self):
        return self.__accel_factor * 1000000

    @acceleration.setter
    def acceleration(self, setting):
        if self.__accel_factor != setting / 1000000:
            if self.running:
                self.pause()
            self.__speed_factor = self.rate / 1000
            self.__accel_factor = setting / 1000000
            self.start()


### This is the central mechanism class that animates the robot ###
class Mechanism():
    """
    The class helps to control multiple motors in a tight loop python program.

    Author:
        Anton's Mindstorms Hacks - https://www.antonsmindstorms.com

    Args:
        motors: list of motor objects. Can be hub.port.X.motor or Motor('X')
        motor_functions: list of functions that take one argument and calculate motor positions

    Optional Args:
        reset_zero: bolean, resets the 0 point of the relative encoder to the absolute encoder position
        ramp_pwm: int, a number to limit maximum pwm per tick when starting. 0.5 is a good value for a slow ramp.
        Kp: float, proportional feedback factor for motor power.

    Returns:
        None.

    Usage:
        my_mechanism = Mechanism([Motor('A'), Motor('B')], [func_a, func_b])
        timer = AMHTimer()
        while True:
            my_mechanism.update_motor_pwms(timer.time)
    """
    def __init__(self, motors, motor_functions, reset_zero=True, ramp_pwm=100, Kp=1.2):
        # Allow for both hub.port.X.motor and Motor('X') objects:
        self.motors = [m._motor_wrapper.motor if '_motor_wrapper' in dir(m) else m for m in motors]
        self.motor_functions = motor_functions
        self.ramp_pwm = ramp_pwm
        self.Kp = Kp
        if reset_zero:
            self.relative_position_reset()

    def relative_position_reset(self):
            # Set degrees counted of all motors according to absolute 0
            for motor in self.motors:
                absolute_position = motor.get()[2]
                if absolute_position > 180:
                    absolute_position -= 360
                motor.preset(absolute_position)

    @staticmethod
    def float_to_motorpower( f ):
        # Convert any floating point to number to
        # an integer between -100 and 100
        return min(max(int(f),-100),100)

    def update_motor_pwms(self, ticks):
        # Proportional controller toward disered motor positions at ticks
        for motor, motor_function in zip(self.motors, self.motor_functions):
            target_position = motor_function(ticks)
            current_position = motor.get()[1]
            power = self.float_to_motorpower((target_position-current_position)* self.Kp)
            if self.ramp_pwm < 100:
                # Limit pwm for a smooth start
                max_power = int(self.ramp_pwm*(abs(ticks)))
                if power < 0:
                    power = max(power, -max_power)
                else:
                    power = min( power, max_power)

            motor.pwm( power )

    def shortest_path_reset(self, ticks=0, speed=20):
        # Get motors in position smoothly before starting the control loop

        # Reset internal tacho to range -180,180
        self.relative_position_reset()

        # Run all motors to a ticks position with shortest path
        for motor, motor_function in zip(self.motors, self.motor_functions):
            target_position = int(motor_function(ticks))
            current_position = motor.get()[1]
            # Reset internal tacho so next move is shortest path
            if target_position - current_position > 180:
                motor.preset(current_position + 360)
            if target_position - current_position < -180:
                motor.preset(current_position - 360)
            # Start the manouver
            motor.run_to_position(target_position, speed)

        # Give the motors time to spin up
        utime.sleep_ms(50)
        # Check all motors pwms until all maneuvers have ended
        while True:
            pwms = []
            for motor in self.motors:
                pwms += [motor.get()[3]]
            if not any(pwms): break

    def stop(self):
        for motor in self.motors:
            motor.pwm(0)
Download GELO Python Motor Synchronization code for Robot Inventor 51515
You can make Gelo walk with 98% the same code as the Ladybug. The only difference is the motor functions. The main control loop in Python for Motor Synchronization is the same. To try it out, build Gelo from the MINDSTORMS app and download the code here:
Conclusion: animating LEGO Robots in Python is a matter of controlling time
I hope you have learned a thing or two about Python and motor control. If you have more questions, feel free to ask them in the comments. If you follow me on Facebook, Instagram, and YouTube, these social media platforms will notify you of new articles and tutorials as I make them.
Watch a video explanation of this article here:


Very cool! I am still trying to understand your code, especially the @… parts and how they work with the other parts. How difficult would it be to change some part so that Gelo would turn left or right?
I think I managed to get Gelo to turn left, right and reverse by changing the signs and time delays for the motor_a, …b, …c, and …d. What I cannot mange to figure out is how to set this up with the distance sensor so that Gelo can detect obstacles and react appropriately. Any hints or help would be greatly appreciated.
Mike
Use the ‘while’ condition of the control loop. Check for distance there.
It was in the while statement that I am attempting to take control of Gelo. I think I got a handle on that. But, I am having troubles dealing with the distance sensor and giving a None value when the variable is expecting an integer value. Any thoughts on how to deal with that?
If not distance_reading: distance_reading = 300
Here what I am able to get working:
I added DistanceSensor at the top after the from Mindstorms import Motor statement. Then after the motor_functions =, and motors =, statement just before the while statement I add:
wall_detector = DistanceSensor(‘E’)
distance = 0
I the changed the if EXTERNAL_CRANK: statement to this:
if not wall_detector.get_distance_cm():
distance = 300
The else part I did not change. So to my thinking Gelo should walk forward! But, in reality Gelo will walk forward for a bit, but then, starts acting strangely like it is having a seizure.
I will make a video for you
Thank you for the video on how to program the distance sensor to control Gelo. I am working on getting Gelo to better react to obstacles and turning. I will see if I can figure out the use of your AMHTimer module to get Gelo to change its speed in relationship to the distance it senses. I will probably need some help with that. Any hints as to how I should proceed would be appropriated.
I have managed to make my own motor class that allows Gelo to backup for 2000 ms and than do the turn for 6000 ms. What I cannot seem to change is the speed Gelo moves at as it approaches an obstacle. I found that if I add * -1 to change the walk_straight function that Gelo walks backwards. But when I try to incorporate the distance measurement say (timer.time * distance) I get an error message. What am I doing wrong?
What’s the error?
I made a change to your Gelo python program to use the yaw_angle instead of time to turn 90 degrees. The problem is that Gelo does not stop turning when the angle is greater than 90 degrees. The other thing I have noticed is the button flashes orange. I am assuming that is a warning message but no message is shown in the programming area. Below is the code I am using for turning.
hub.motion.reset_yaw()
yaw_angle, pitch_angle, roll_angle = hub.motion.positio()
while abs(yaw_angle) < 90
turn.update_motor_pmw(timer.time)
Thank you for all your help.
Orange is for low battery, usually.
One mystery solved! The flashing orange light was the hub telling me that it was running low on power. Now just to figure out how to do a turn using the yaw_angle.
Second problem solved! The reason Gelo would not stop turning was that I was not updating the yaw_angle. I added this line in after the while statement shown above.
yaw_angle, pitch_angle, roll_angle = hub.motion.position()
I have not been able to figure out how to use the distance() value to control the speed that Gelo moves forward at.
I am also looking forward to knowing how you made Gelo do those handstands!
You can control speed by setting timer.rate = any_number_less_than_1000
I tried printing the distance value. This is what I get as output:
[20:50:24.764]>
So, if I am going to use the distance sensor output to control Gelo’s speed I need to be able to extract the distance value from the distance sensor output. Any ideas on how to extract or convert the output to a usable integer value?
For some reason putting the <> cause the line to delete???
function distance at 0x200476f0
This the other part of the distance sensor output.
Thanks so much for sharing all this. It’s cleared up a lot of what I previously didn’t understand about programming in Python. And, more to the point, about synchronising motors. Although I have a lot of experience in other languages, I’ve never used Python before. So your examples, both here and in other pages, have proved very useful.
One section I do not understand is this line:
self.motors = [m._motor_wrapper.motor if ‘_motor_wrapper’ in dir(m) else m for m in motors]
Where does “m._motor_wrapper.motor” derive from?
Your advice would be very much appreciated.
The hub has a ‘native’ motor API under hub.port.A.motor. And then LEGO designed another API that acts more like scratch ‘to make the transition easier’. m._motor_wrapper.motor finds the native API motor object that is hidden under the scratch-like API. The native motor object has a big advantage: it is non-blocking.
Any idea how I can make three motors all reach their desired number of rotations (which vary from each other) simultaneously? Thanks.
Ibrahim FitzGibbon
Check my other article with keyframe animations. Using that technique you can define a point in time where all motors reach the desired number of rotations.
DESIRED_DEGREES = 720

POINT_IN_TIME = 5000 #ms

keyframes = [

(0, 0), # start

(POINT_IN_TIME, DESIRED_DEGREES)

]
https://www.antonsmindstorms.com/2021/02/20/keyframe-motor-animation-with-python-for-mindstorms-and-spike-robots/
The better way to accomplish this is using asynchronous code. You can use broadcast in Python:
async def run(vm, stack):
vm.broadcast(“run”)
async def display(vm, stack):
await vm.system.display.write_async(“Hello world”)
async def sound(vm, stack):
vm.system.motors.on_port(“A”).run_for_degrees_async(100, 100, stall=vm.store.motor_stall(“A”), stop=vm.store.motor_stop(“A”), acceleration=100, deceleration=0)
await vm.system.sound.play_async(“/extra_files/Hello”)
await vm.system.sound.play_async(“/extra_files/Hello”)
#await vm.system.sound.play_async(“/extra_files/Celebrate”)
async def cancel(vm, stack):
vm.stop_stacks(except_stack=stack)
hub.display.clear()
hub.sound.beep(0, 0)
def setup(rpc, system, stop):
vm = runtime.VirtualMachine(rpc, system, stop, “hello_world”)
vm.register_on_start(“run_on_start”, run)
vm.register_on_broadcast(“display_on_run”, display, “run”)
vm.register_on_broadcast(“sound_on_run”, sound, “run”)
vm.register_on_button(“cancel_on_left_button”, cancel, “left”, “pressed”)
vm.register_on_button(“run_on_right_button”, run, “right”, “pressed”)
return vm
class RPC:
def emit(self, op, id):
pass
setup(RPC(), system.system, sys.exit).start()
and to call motors you use this: run_for_degrees_async. Its hairy and not recommended for the target audience, but I think its better than running a while loop checking for motor positions all the time.
async def stack_1(vm, stack):
    (acceleration, deceleration) = vm.store.motor_acceleration("F")

vm.store.motor_last_status("F", await vm.system.motors.on_port("F").run_for_degrees_async(100, -vm.store.motor_speed("F"), stall=vm.store.motor_stall("F"), stop=vm.store.motor_stop("F"), acceleration=acceleration, deceleration=deceleration))
You can use asynchronous functions to accomplish this:
async def run(vm, stack):
vm.broadcast(“run”)
async def display(vm, stack):
await vm.system.display.write_async(“Hello world”)
async def sound(vm, stack):
vm.system.motors.on_port(“A”).run_for_degrees_async(100, 100, stall=vm.store.motor_stall(“A”), stop=vm.store.motor_stop(“A”), acceleration=100, deceleration=0)
await vm.system.sound.play_async(“/extra_files/Hello”)
await vm.system.sound.play_async(“/extra_files/Hello”)
#await vm.system.sound.play_async(“/extra_files/Celebrate”)
async def cancel(vm, stack):
vm.stop_stacks(except_stack=stack)
hub.display.clear()
hub.sound.beep(0, 0)
def setup(rpc, system, stop):
vm = runtime.VirtualMachine(rpc, system, stop, “hello_world”)
vm.register_on_start(“run_on_start”, run)
vm.register_on_broadcast(“display_on_run”, display, “run”)
vm.register_on_broadcast(“sound_on_run”, sound, “run”)
vm.register_on_button(“cancel_on_left_button”, cancel, “left”, “pressed”)
vm.register_on_button(“run_on_right_button”, run, “right”, “pressed”)
return vm
class RPC:
def emit(self, op, id):
pass
setup(RPC(), system.system, sys.exit).start()
And use run_for_degrees_async to move the motors: vm.store.motor_last_status(“F”, await vm.system.motors.on_port(“F”).run_for_degrees_async(100, -vm.store.motor_speed(“F”), stall=vm.store.motor_stall(“F”), stop=vm.store.motor_stop(“F”), acceleration=acceleration, deceleration=deceleration))
I wanted to show some friend Gelo walking and doing handstands using Python. I used the code that I can download from your website. I also used your YouTube video for guidance. I managed to get Gelo to do a handstand on the second attempt to do the handstand. Then, instead of going back down onto its feet, Gelo walks backwards while in the handstand. Then, when it is ready to walk forwards again it comes out of the handstand. I was going to see if I could use the block program and figure out what is wrong. It looks like Lego has removed the trick programming. The only thing is a set Gelo to trick position block.
Also, the motors listed in
motor[
hub.port.A.motor, #back leg
hub.port.B.motor, #back leg
hub.port.C.motor, #front leg
hub.port,D.motor, #front leg
]
Does this order match with the functions setup? If so, then you have the naming backwards. It still works — I tried changing the motor[] order and then Gelo cannot do a handstand.
If you have time can you rebuild Gelo and test you programming code? https://www.antonsmindstorms.com/wp-content/uploads/2021/01/Gelo-Python.lms_.zip
Any help would be appreciated.
Mike,